
ActivityTimeline can be configured in different ways depending on how your organization plans work, manages teams, and tracks time in Jira.
This Quick Start Guide walks administrators through the recommended initial setup — from Jira integration and team configuration to planning, workload, and time tracking.
Recommended Setup Order
Follow these steps to configure ActivityTimeline around the way your organization plans and tracks work. Each step helps you answer one key setup question, from deciding what Jira data to use to validating the configuration with a real team.
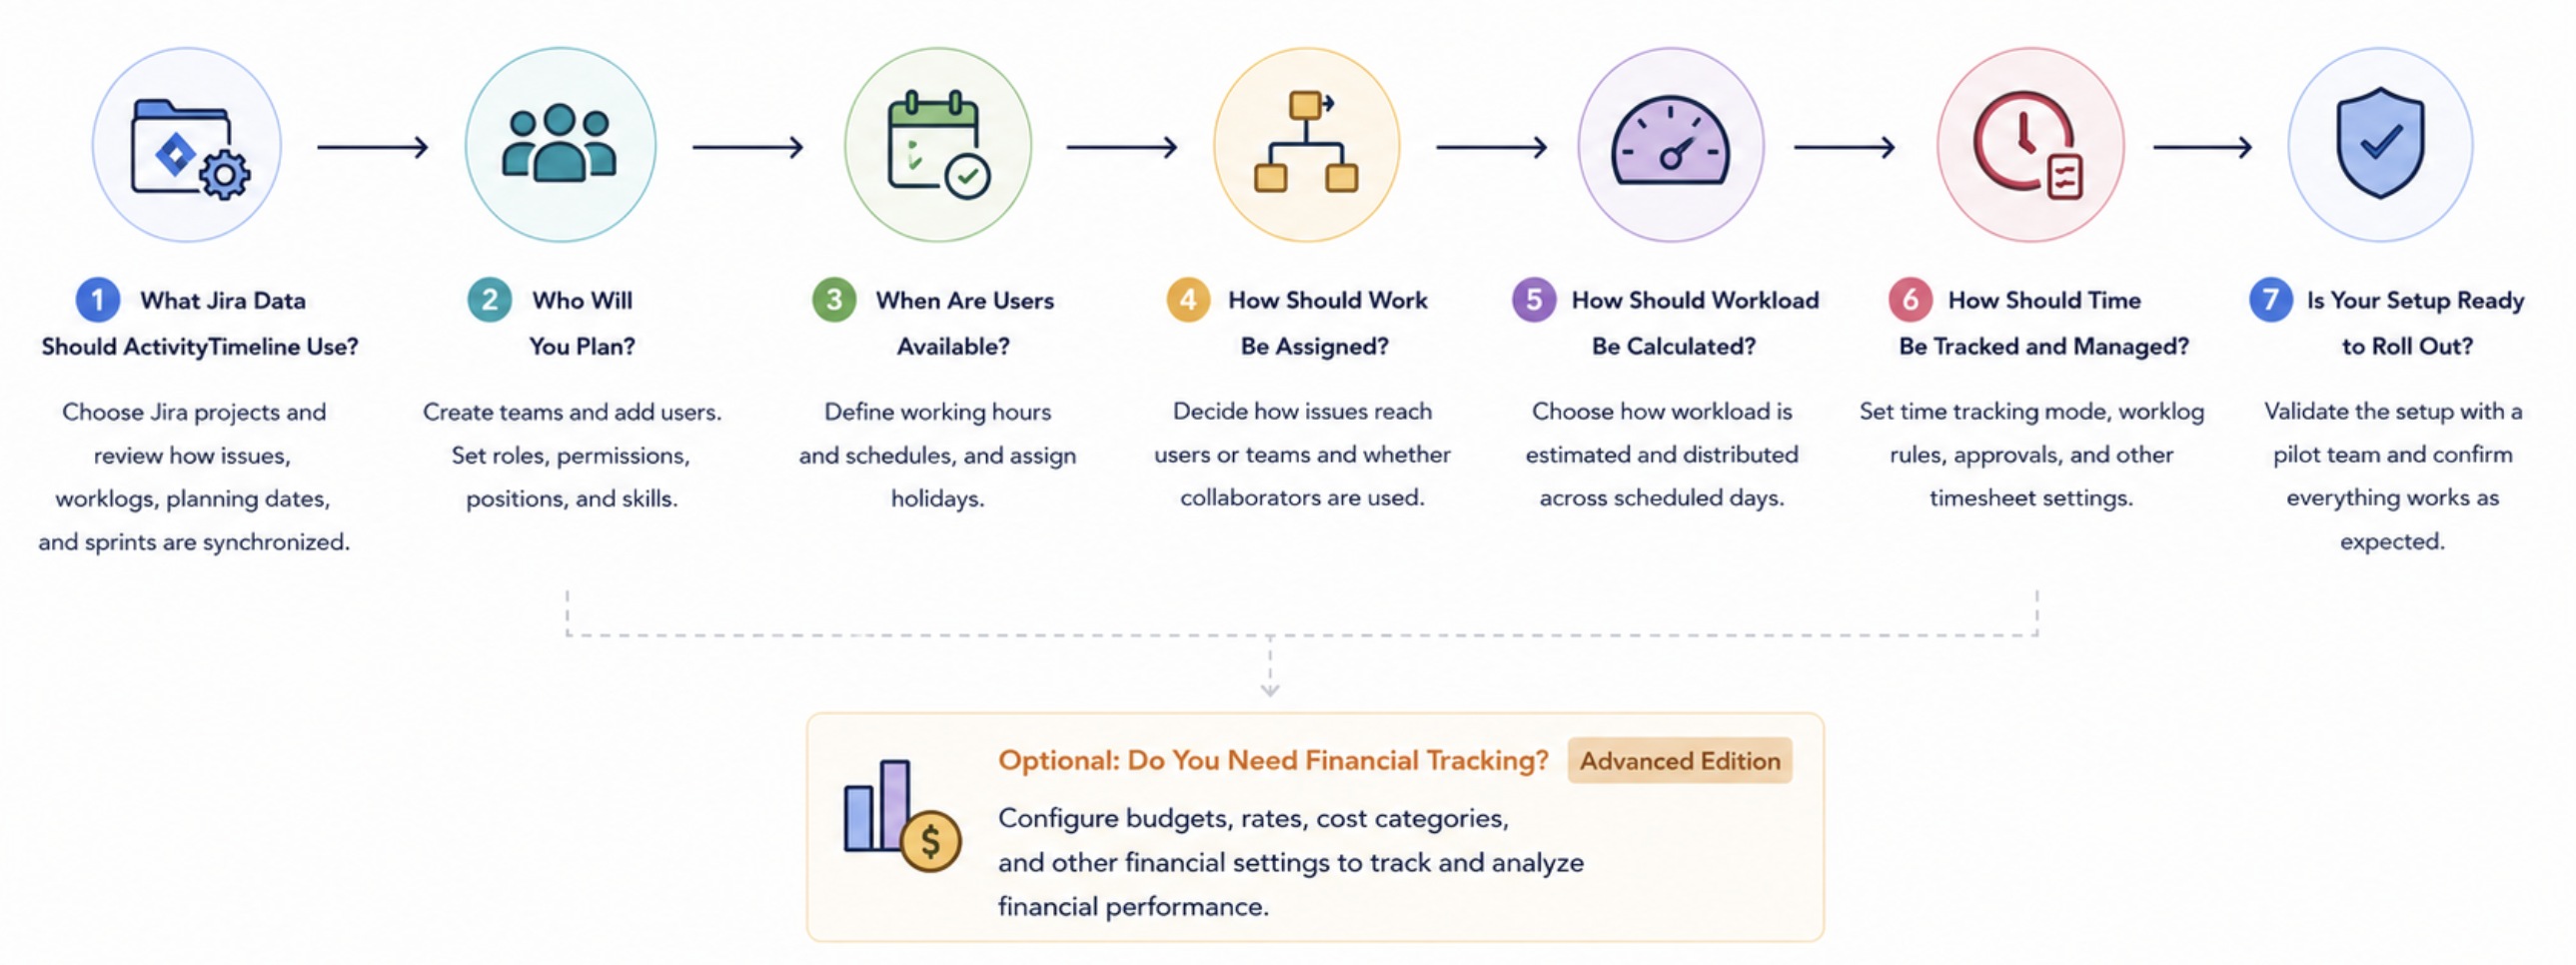
Some settings are required for every instance, while others are optional depending on your workflow.
1. How Should ActivityTimeline Use Your Jira Data?
First, decide what Jira data ActivityTimeline should use and how planning should work.
Confirm that the Jira projects you want to manage in ActivityTimeline are active and synchronized. If the correct projects were already selected during the initial setup, no additional changes are required.If a project is deactivated in ActivityTimeline, new changes from that project are no longer synchronized, while previously synchronized data remains available until it is removed.
To learn how synchronization between ActivityTimeline and Jira works, visit: Synchronization
ActivityTimeline automatically syncs changes from Jira every 10 minutes. If a change you just made in Jira isn't showing up yet, that's expected — check back shortly, or use a manual Refresh if you need it immediately.
Why this matters: Project scope determines which Jira issues and worklogs are available for planning, time tracking, and reporting in ActivityTimeline
By default, ActivityTimeline uses Jira Start Date and Due Date for Company-Managed projects. If these are the fields your organization uses for planning, no changes are required.
If you use different Jira date fields, map them as the Planned Start and End Date fields in ActivityTimeline.
For Team-Managed projects, planning dates are configured separately. You can either reuse Jira’s standard Start/Due Date fields to keep planning synchronized with Jira, or keep planning dates only in ActivityTimeline.
Why this matters: These settings determine which Jira data ActivityTimeline uses and how Jira issues appear and stay up to date in the Planner.
If your teams plan work in Jira Sprints, ActivityTimeline can automatically place issues on user timelines using Sprint Start and End dates. This behavior is enabled by default, so no additional setup is normally required.
Individual Jira Start/End dates take priority over Sprint dates. If you want an issue to follow its Sprint dates, its individual planning dates should be empty or not mapped.
Add the ActivityTimeline webhooks to ensure issues and worklogs deleted in Jira are also removed from ActivityTimeline.
2. Set Up Teams and Users
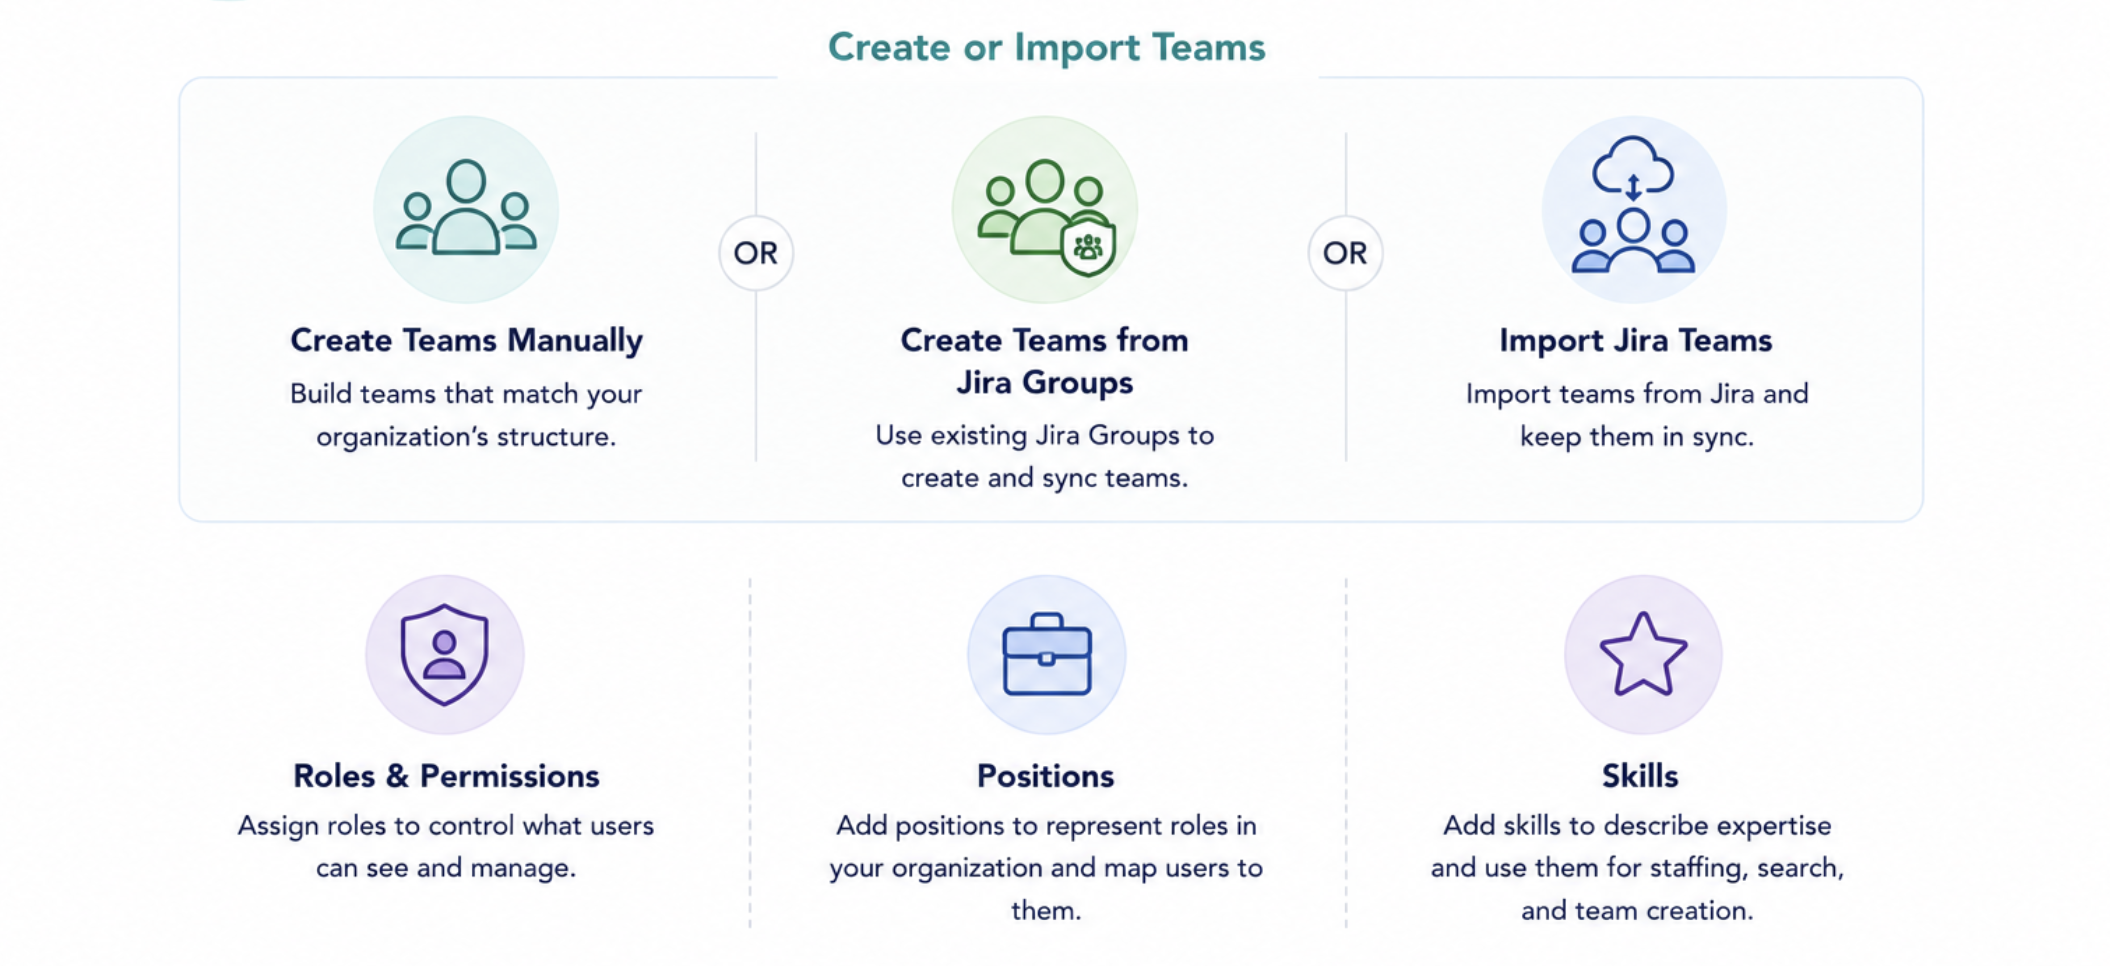
Next, define who you want to plan and how your organization is structured in ActivityTimeline.
-
Create teams manually, from Jira Groups, or import Jira Teams if you already use them.
-
Assign the appropriate roles and permissions to control what users can view and manage.
-
Configure positions and skills if you use them for staffing, resource search, or team creation.
Why this matters: Teams and users form the structure of the Planner, reporting, and capacity calculations.
3. When Are Users Available?
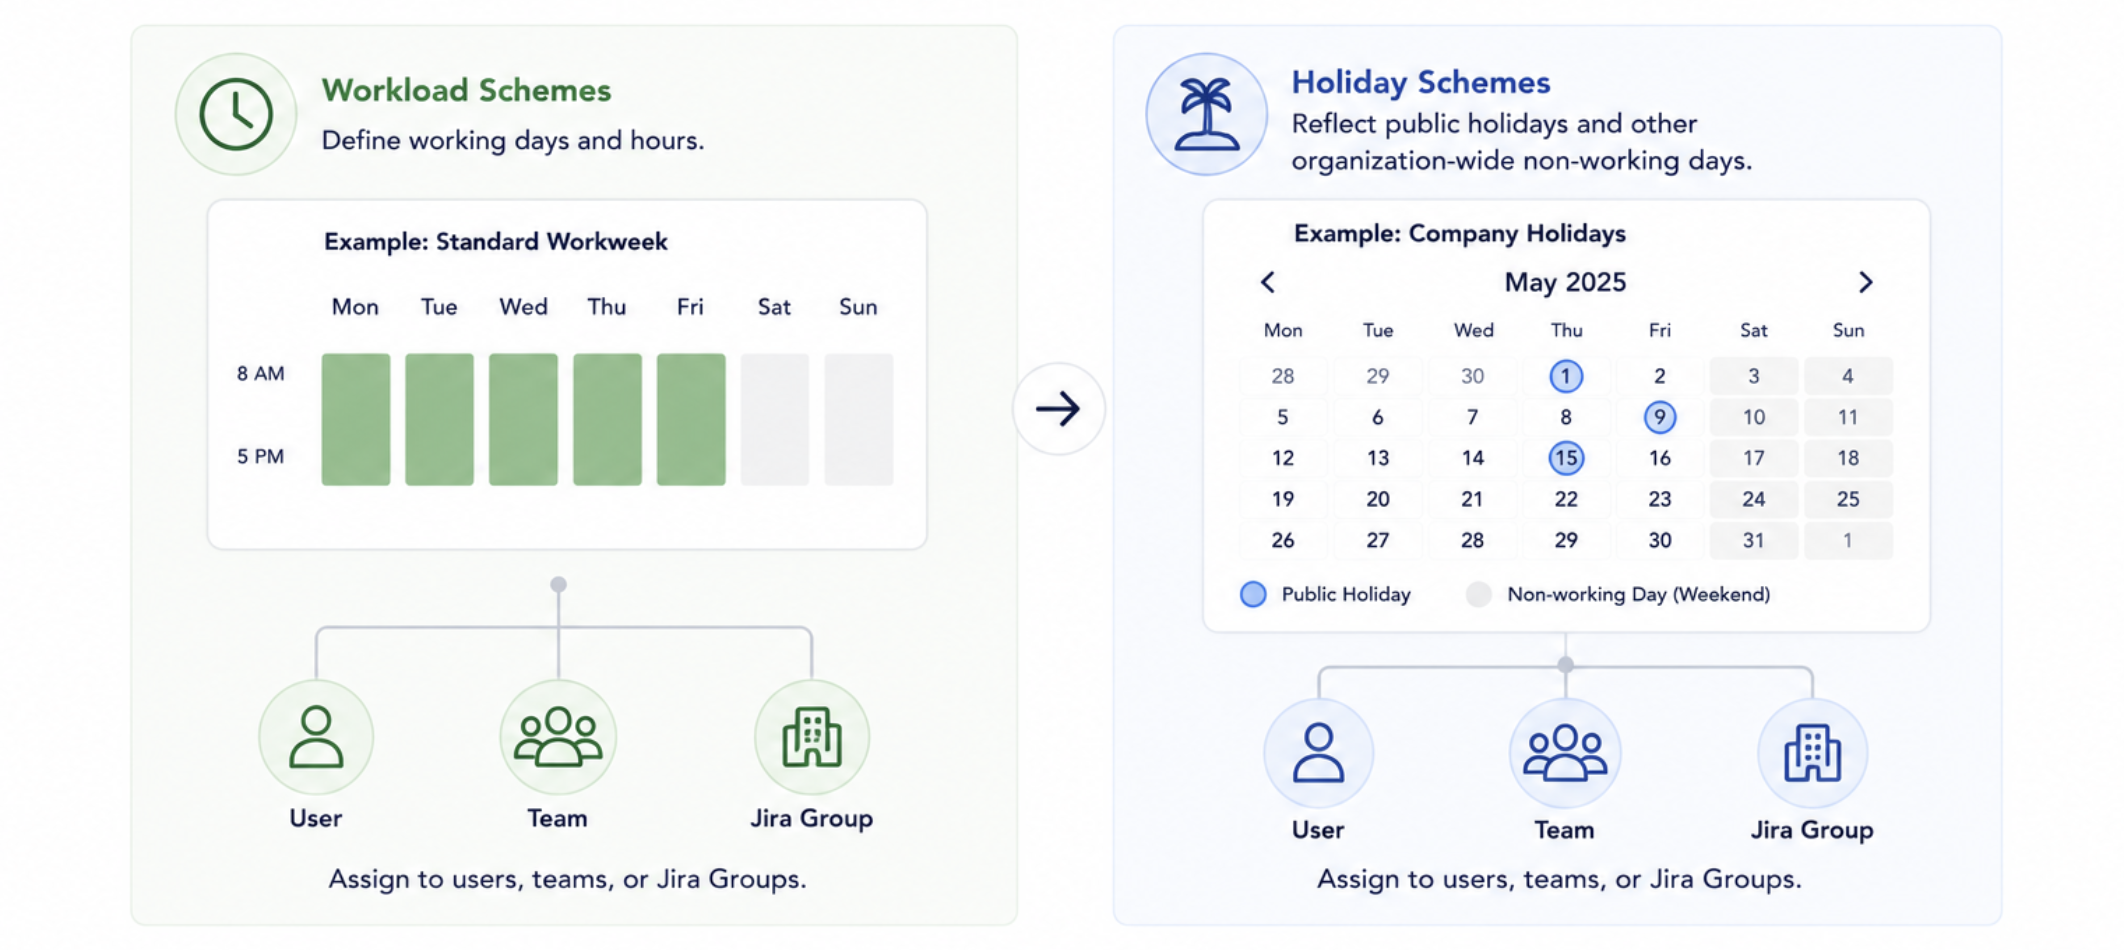
Define when users are available for work and how much capacity ActivityTimeline should use for planning.
-
Assign Workload Schemes to define working days and hours.
-
Assign the appropriate Holiday Schemes so public holidays and other organization-wide non-working days are reflected in capacity. If users have different schedules, create additional schemes and assign them individually or through Jira Groups.
Why this matters: ActivityTimeline compares planned workload with each user’s available capacity. Setting this up correctly ensures that availability, utilization, and overload indicators are accurate.
4. How Should Work Be Assigned?
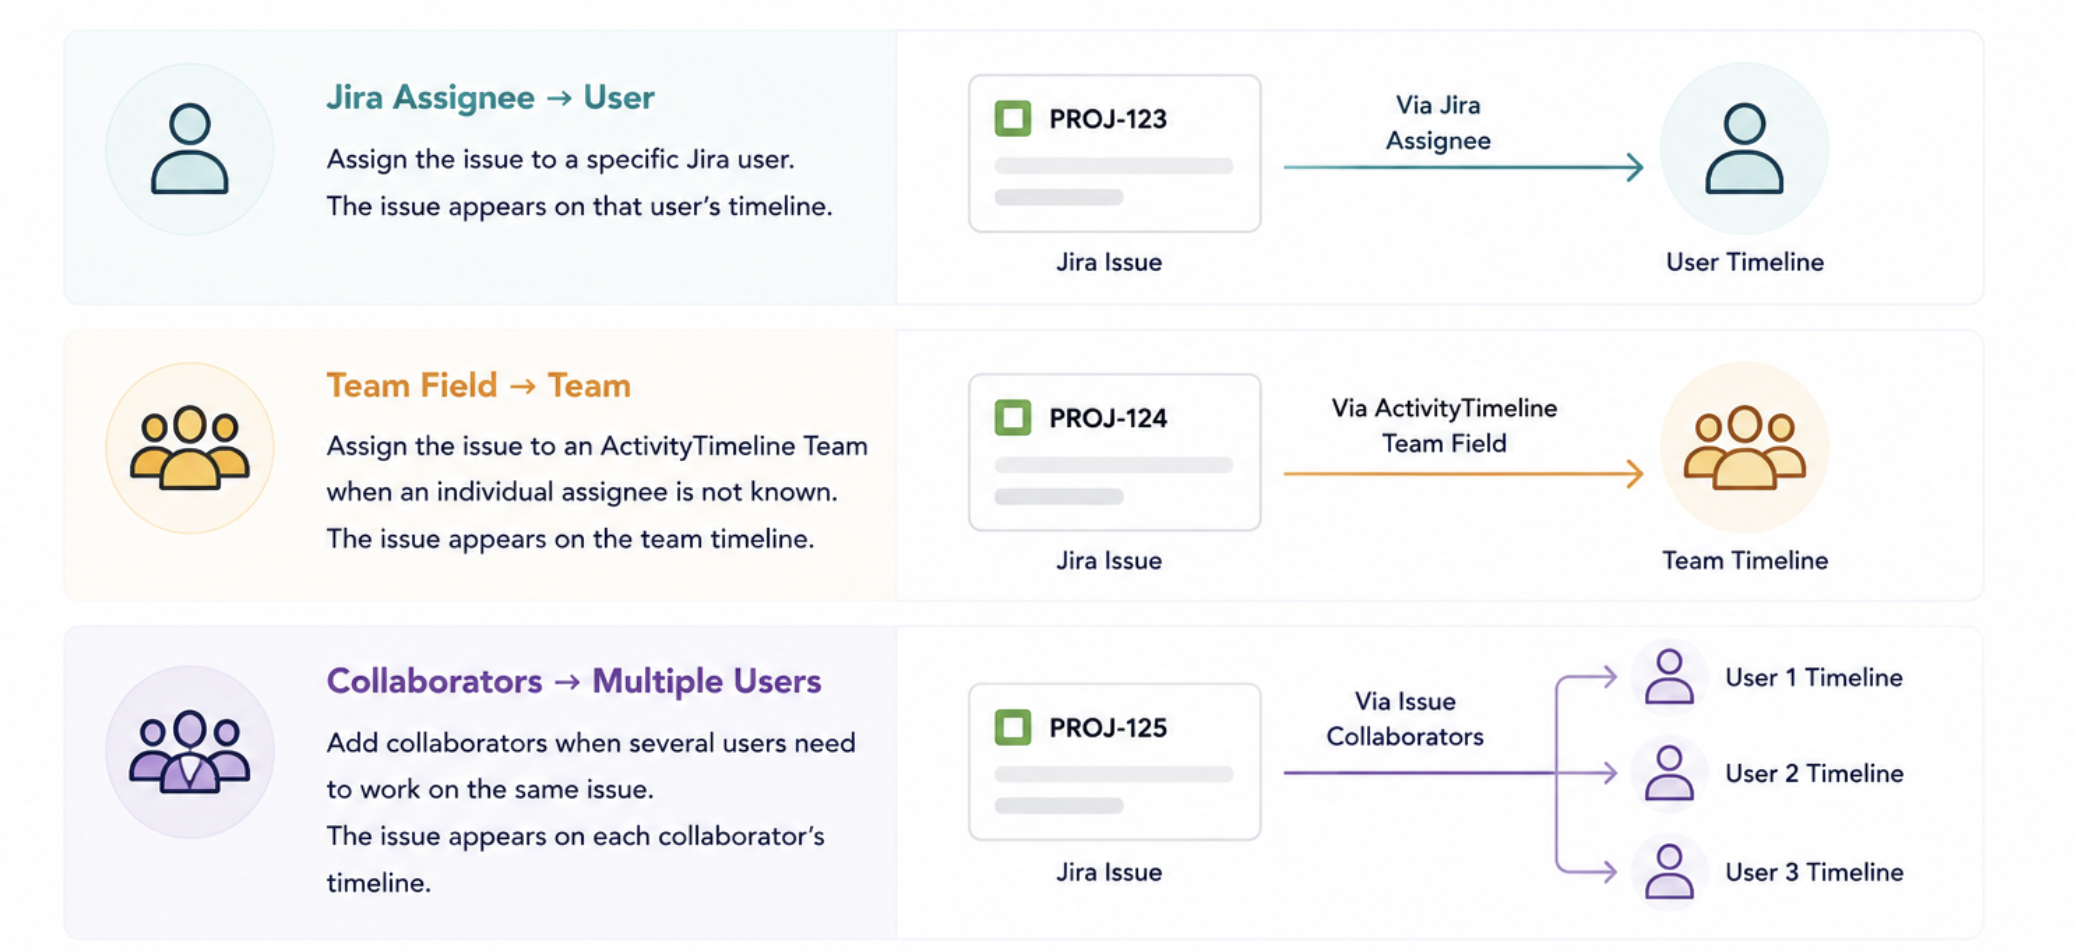
By default, ActivityTimeline uses the Jira Assignee field to place issues on the corresponding user’s timeline.
If your planning process requires more flexibility, you can optionally configure:
-
ActivityTimeline Team field — use it when an issue should be assigned to a team before an individual assignee is known.
-
Issue Collaborators — use it when several users need to work on the same Jira issue.
Why this matters: These settings determine where work appears in ActivityTimeline and whether it is planned for an individual user, a team, or multiple collaborators.
5. How Should Workload Be Calculated?
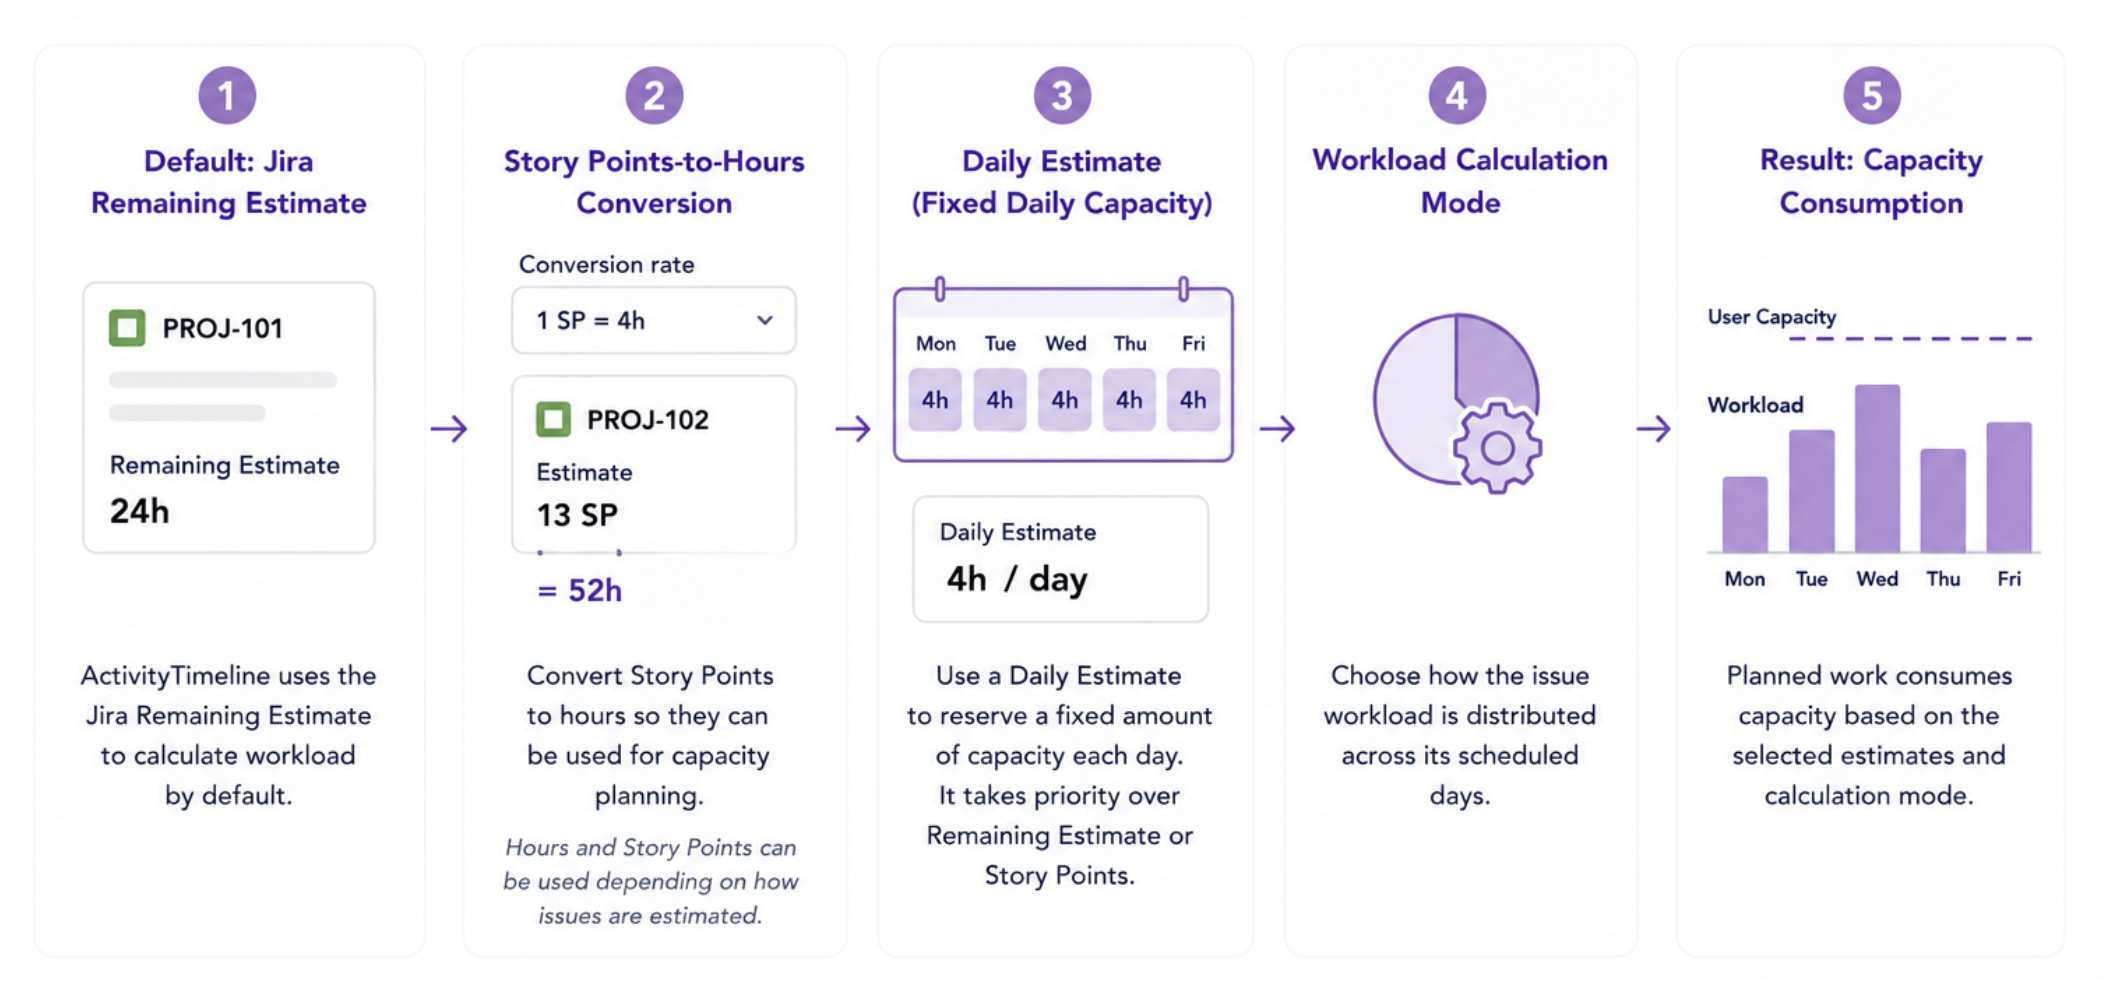
Once users, capacity, and assignments are configured, review how planned work should consume that capacity.
-
By default, ActivityTimeline uses the Jira Remaining Estimate to calculate workload.
-
If your teams estimate work in Story Points, you can configure a Story Points-to-hours conversion so these estimates can also be used for capacity planning. Hours and Story Points can be used depending on how individual issues are estimated.
-
For work that should reserve a fixed amount of capacity each day, use a Daily Estimate. If a Daily Estimate is set, it takes priority over the Jira Remaining Estimate or Story Points for workload calculation.
-
Finally, choose the Workload Calculation Mode that determines how the issue workload is distributed across its scheduled days.
Why this matters: These settings determine how much capacity planned work consumes and how ActivityTimeline identifies available capacity and overloads.
6. How Should Time Spent Be Tracked and Managed?
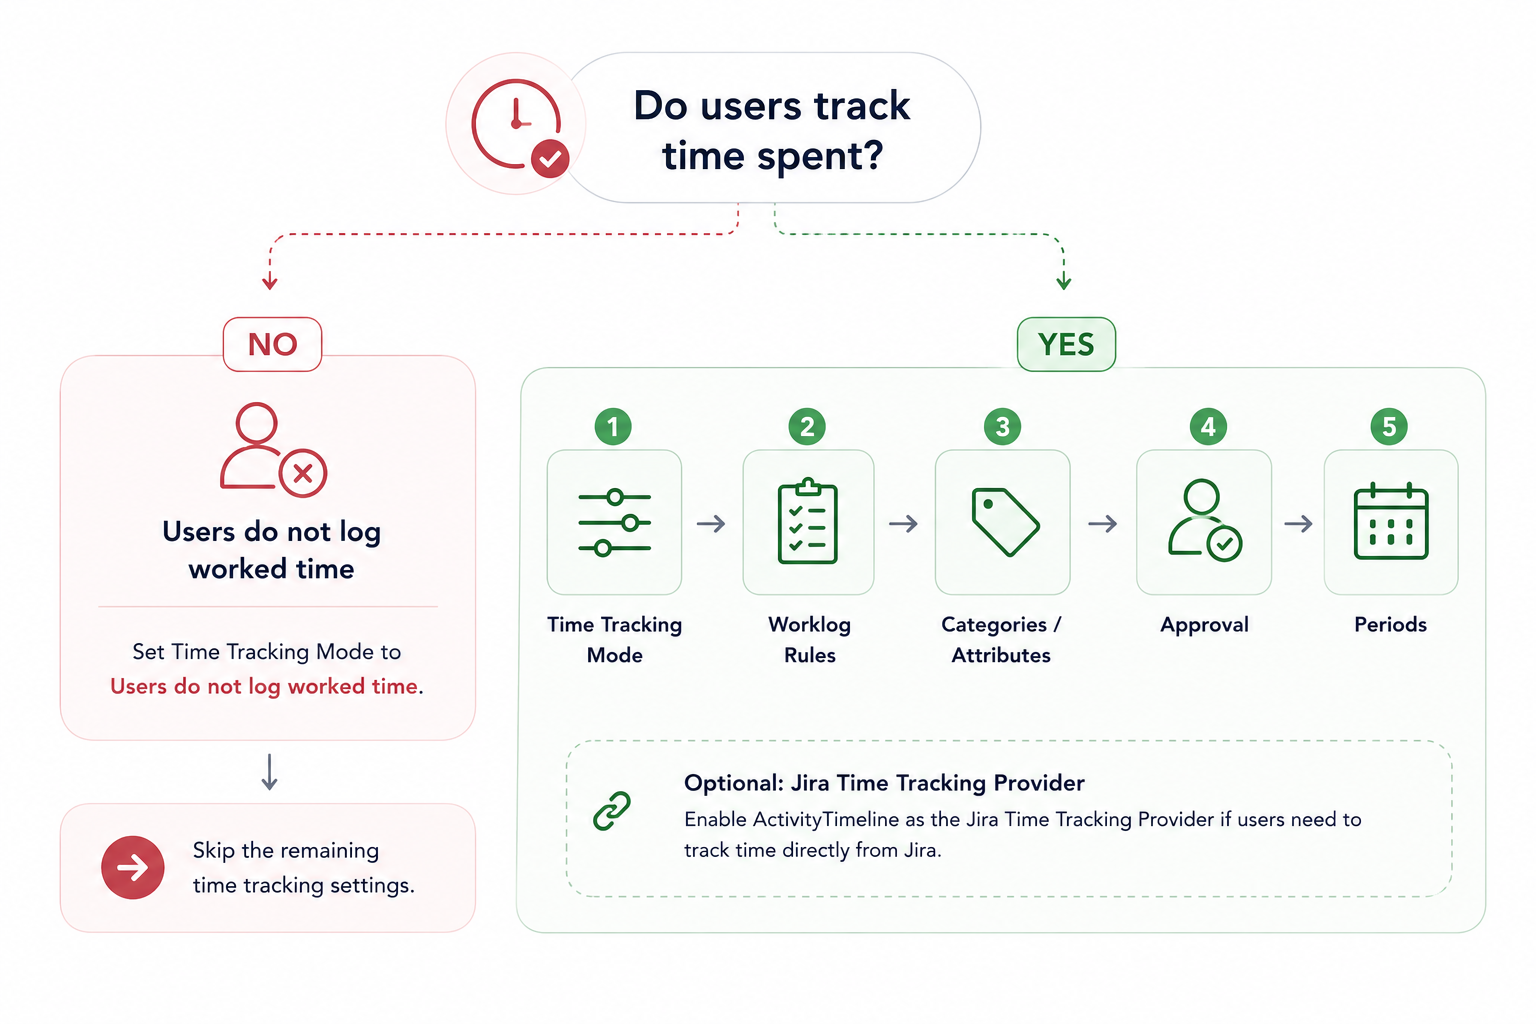
First, decide whether your teams log actual worked time.
If users do not log worked time:
Select Users do not log worked time as the Time Tracking Mode. You can then skip the remaining time-tracking and timesheet configuration in this step.
If users do log worked time:
Choose the Time Tracking Mode that matches how your organization plans and tracks work, then review the settings below to define how time should be logged and managed.
You can configure:
-
Timesheet rules — for example, whether users can log time on resolved issues, log future or past work, or whether a work description is required.
-
Worklog Categories and Attributes — if logged time needs to be classified for reporting, billing, or internal work types.
-
Timesheet Approval — if submitted time needs to be reviewed by managers or team leads.
-
Time Tracking Periods and Period Closure — if you need to control when historical worklogs can still be added or edited.
-
ActivityTimeline as the Jira Time Tracking Provider — if you want users to access ActivityTimeline time tracking directly from Jira.
Why this matters: Your time tracking setup determines how actual worked time affects remaining workload and how worklogs are recorded, classified, reviewed, and reported.
7. Is Your Setup Ready to Roll Out?
Start with one representative team and make sure the configuration works as expected before rolling ActivityTimeline out across the organization.
Check that:
-
The required Jira projects and issues are available in ActivityTimeline.
-
Jira issues appear for the correct users and teams.
-
Planning dates are correct.
-
Sprint dates behave as expected, if used.
-
User working hours and holidays are reflected correctly in capacity.
-
Team assignments and Issue Collaborators work as expected, if configured.
-
Workload is calculated and distributed correctly.
-
A newly created or updated worklog is synchronized correctly.
-
Time logging restrictions behave as expected, if configured.
-
The approval process works correctly, if enabled.
Why this matters: A short pilot helps identify configuration changes before you introduce ActivityTimeline to the rest of the organization.
Optional: Do You Need Financial Tracking?
If you use the Advanced Edition, configure Finances to connect logged Jira work with budgets, costs, revenue, and profitability.
Start by:
-
Creating a Budget and defining which Jira work it should track.
-
Configuring cost and billing rates so ActivityTimeline can calculate labor cost and revenue.
-
Setting Budget Allocations if you want to compare planned financial targets with actual spend.
-
Adding manual transactions for costs or revenue that do not come from Jira worklogs.
-
Reviewing the financial reports to track budget consumption, spend, revenue, and profitability.
Why this matters: Finances connects the operational work already tracked in ActivityTimeline with its financial impact, helping you understand what work costs, whether you are staying within budget, and how delivery affects profitability
Setup Video
Watch the video below to learn how to configure ActivityTimeline in under 7 minutes.