
What it does
Workspace allows individual users to review assigned work, follow their schedule, and log time in one place.
It gives you a clear, personal view of:
-
your assigned Jira issues (left panel),
-
your logged time and progress (top charts),
-
your planned work (My Schedule),
-
and your worklogs (tables below).
Workspace answers three key questions:
-
What should I work on?
-
What is planned for me?
-
What have I already done?
While Planner is used to plan and assign work, Workspace is where users manage and execute their daily tasks.
Required Permission
Workspace is available to users with the following roles:
-
Administrator;
-
Manager;
-
Power Team Lead & Team Lead
-
Power Employee ;
-
Employee;
-
Limited Employee.
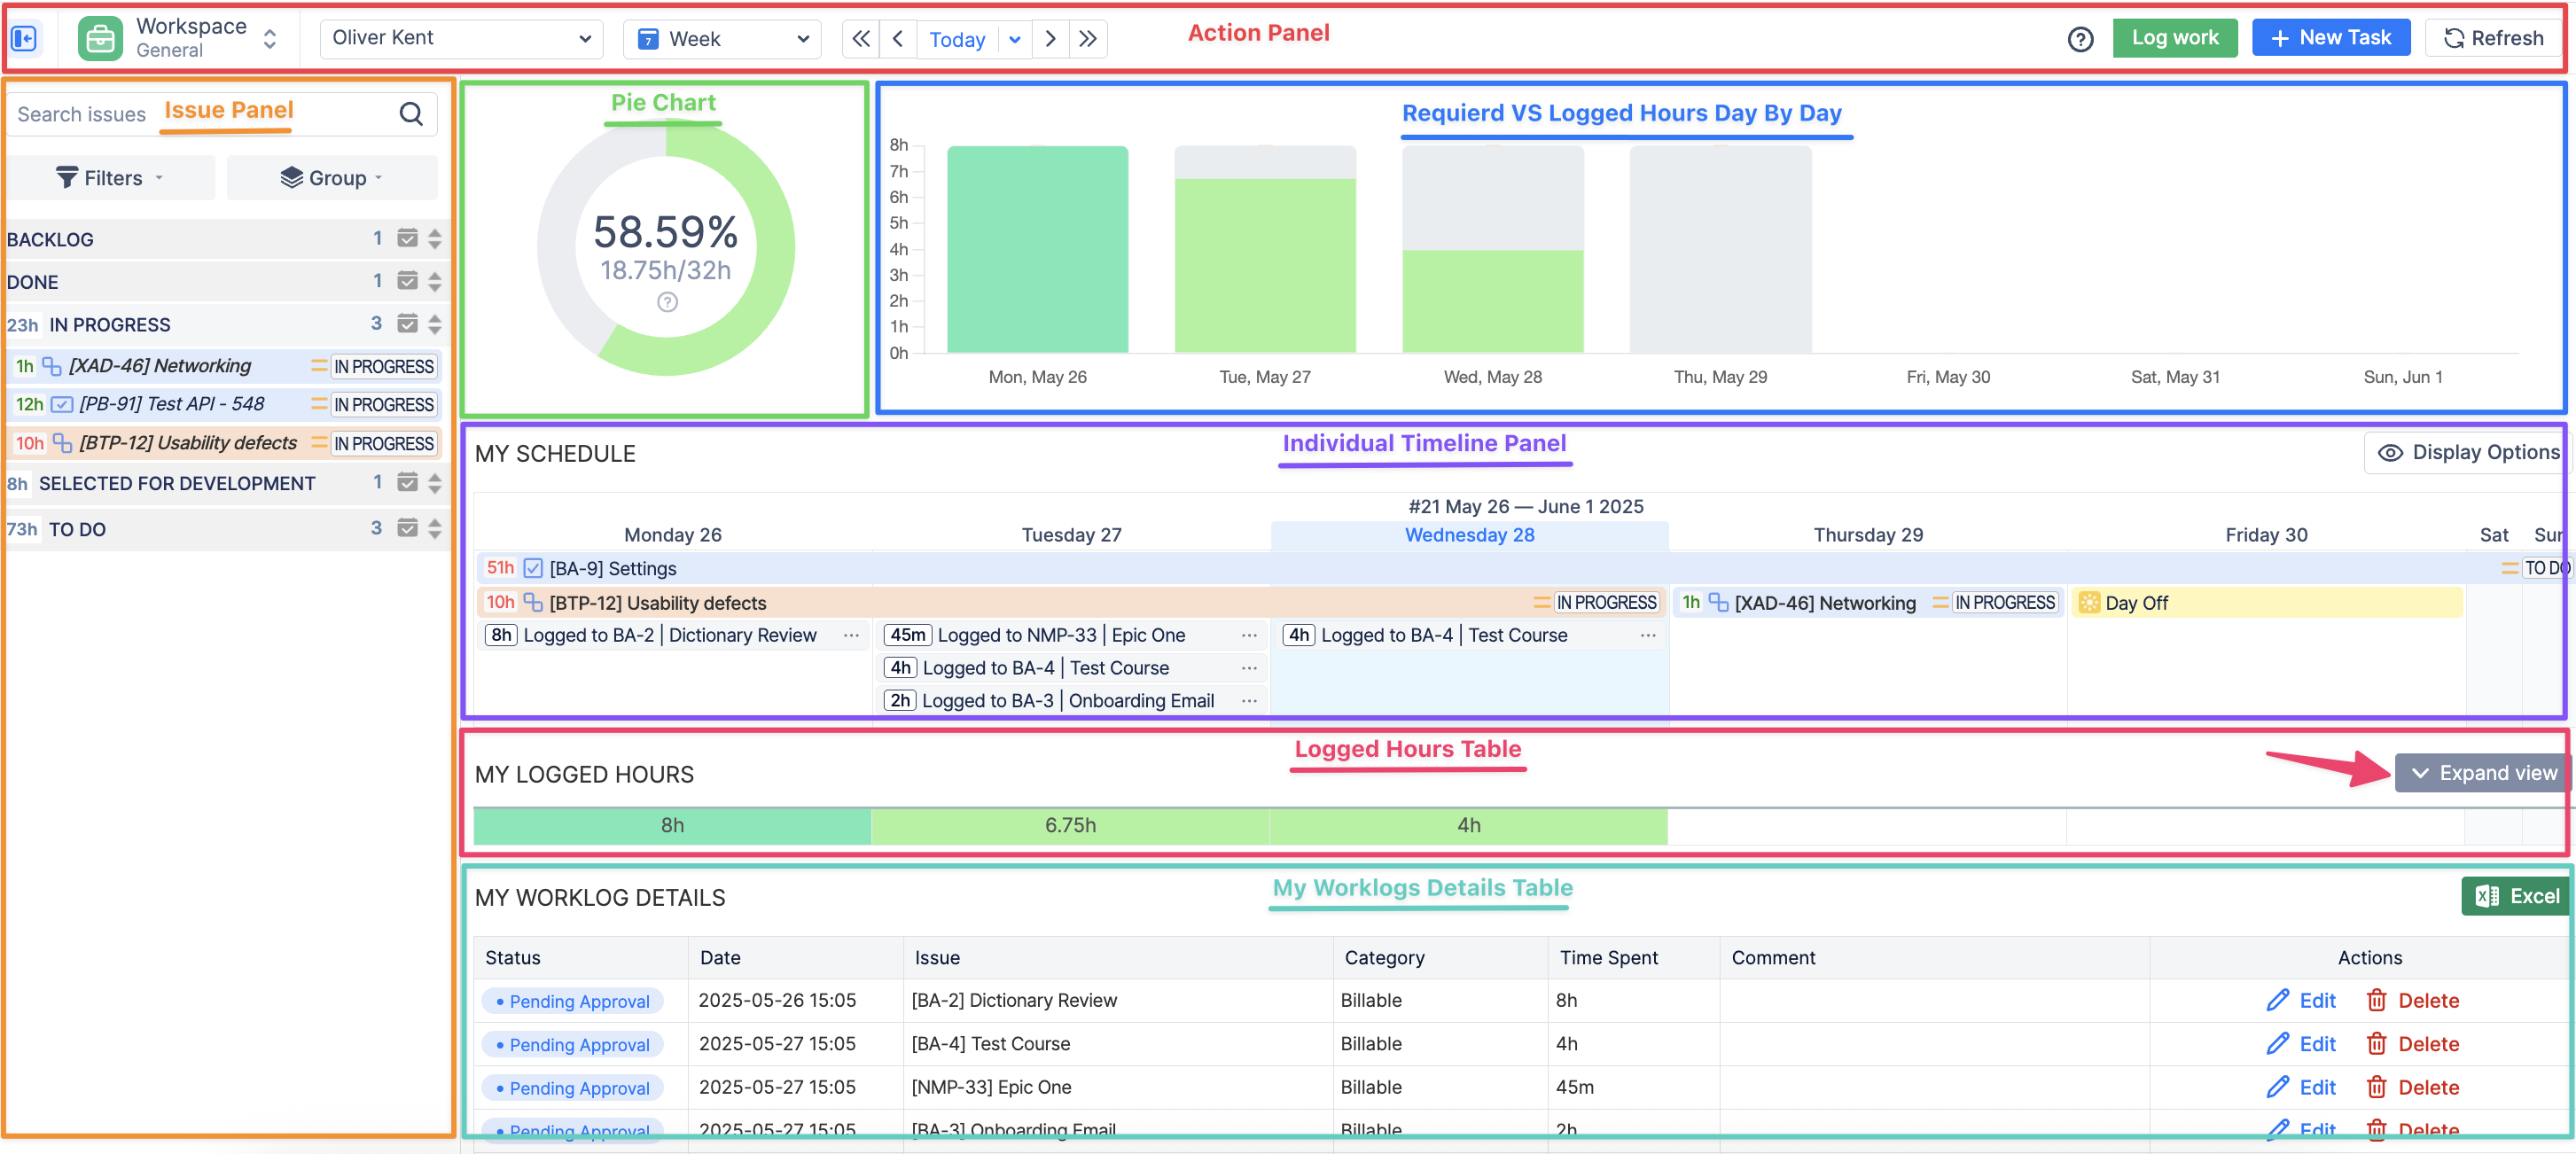
Main Areas of Workspace
Workspace is divided into several sections that help you manage your work.These sections guide your daily workflow from tasks → schedule → time tracking.
To hide the left Issue panel click on the arrow icon on the top left corner of Workspace.

Issue Panel
Located on the left side, the Issues Panel shows Jira issues assigned to you.
You can use it to:
-
review your assigned tasks,
-
quickly search for issues,
-
filter and group issues.
By default:
-
Assigne is set to Current User,
-
Resolution is set to Unresolved,
-
Status is set to All.
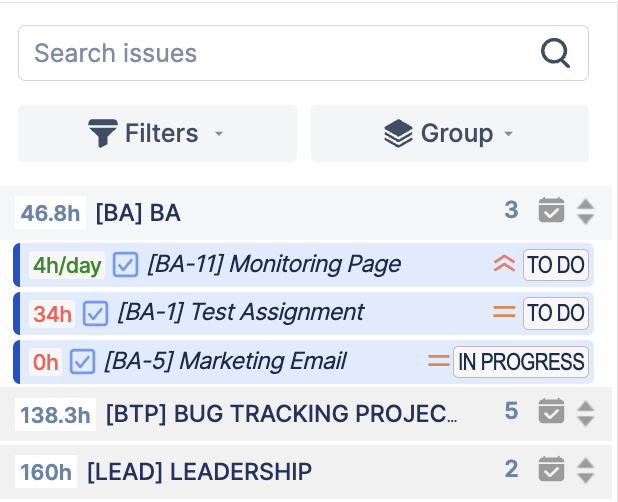
Each issue is displayed as a bar that provides a quick overview of the task, showing key details like:
-
remaining estimate,
-
issue key and name,
-
status and etc.
Logged Hours Overview
At the top of the page, Workspace shows:
-
a progress chart with logged vs required hours,
-
and a daily breakdown of logged time for the selected period.
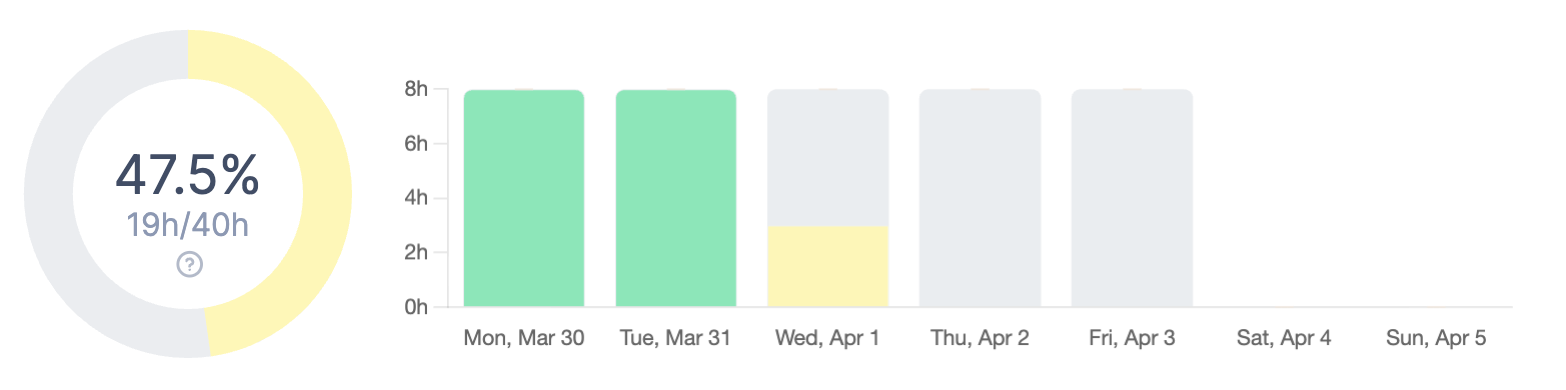
This helps you quickly understand:
-
how much time you’ve logged,
-
whether you are on track.
My Schedule
My Schedule is the main timeline table in Workspace.
Here, users can:
-
view scheduled Jira issues and custom events,
-
create, edit, and manage Jira tasks or custom events,
-
and see logged time directly on the schedule.

Scheduling and Unscheduling Work
Issues can be scheduled in two ways:
-
by dragging and dropping, resizing them in the schedule,
-
or by clicking the issue, selecting Schedule, and defining the Start and End dates.
Actions with Work items & Events on My Schedule
The following actions can be performed on the My Schedule panel:
-
Create Jira Tickets
Actions with Worklogs on My Schedule
In addition to Jira issues and custom events, users can also view and log time directly on My Schedule.
All logged hours appear on the relevant day when the time was logged. Users can log time with one click on a Jira issue, choose Log Work and the system automatically fills in the required fields, including the available hours to log and the date.
My Schedule also supports these worklog actions:
-
Drag-and-drop worklogs to change the worklog date.
-
Resize worklogs to automatically create copies of worklogs for additional days covered by the resized period.
To open the worklog in Jira, click the logged hours entry.
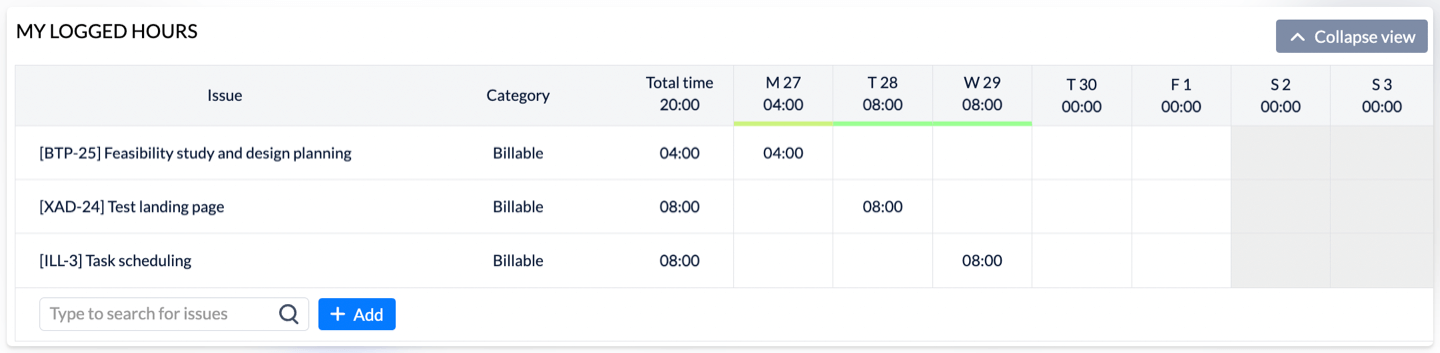
My Logged Hours
My Logged Hours is the main panel for managing logged work.
From this panel, users can:
-
track worklogs,
-
edit the date, time, and comment,
-
add new worklogs,
-
delete existing worklogs.
How to Log Work
You can Log Work on My Workplace page in different ways:
-
Click the Log Work button.
-
Click on the Add new worklog button

-
Click on the Jira ticket on the Issues Panel or on Timeline to open the Issue Card, and then click on Log work link.
-
Click on a Bar Chart.

How to Manage Logged Work
The first My Logged Hours panel shows logged hours per day and is collapsed by default.
When hovering over the logged hours for a day, an Add new worklog button appears.
When the view is expanded, the table displays all issues worked on during the current period. Users can then click the relevant cell to log time for a selected task on a selected date.

My Worklog Details
The My Worklog Details table displays all worklogs for the selected period.
From here, users can:
-
edit the date,
-
edit the number of hours,
-
edit comments,
-
delete worklogs.
All changes made here are automatically synchronized with Jira.
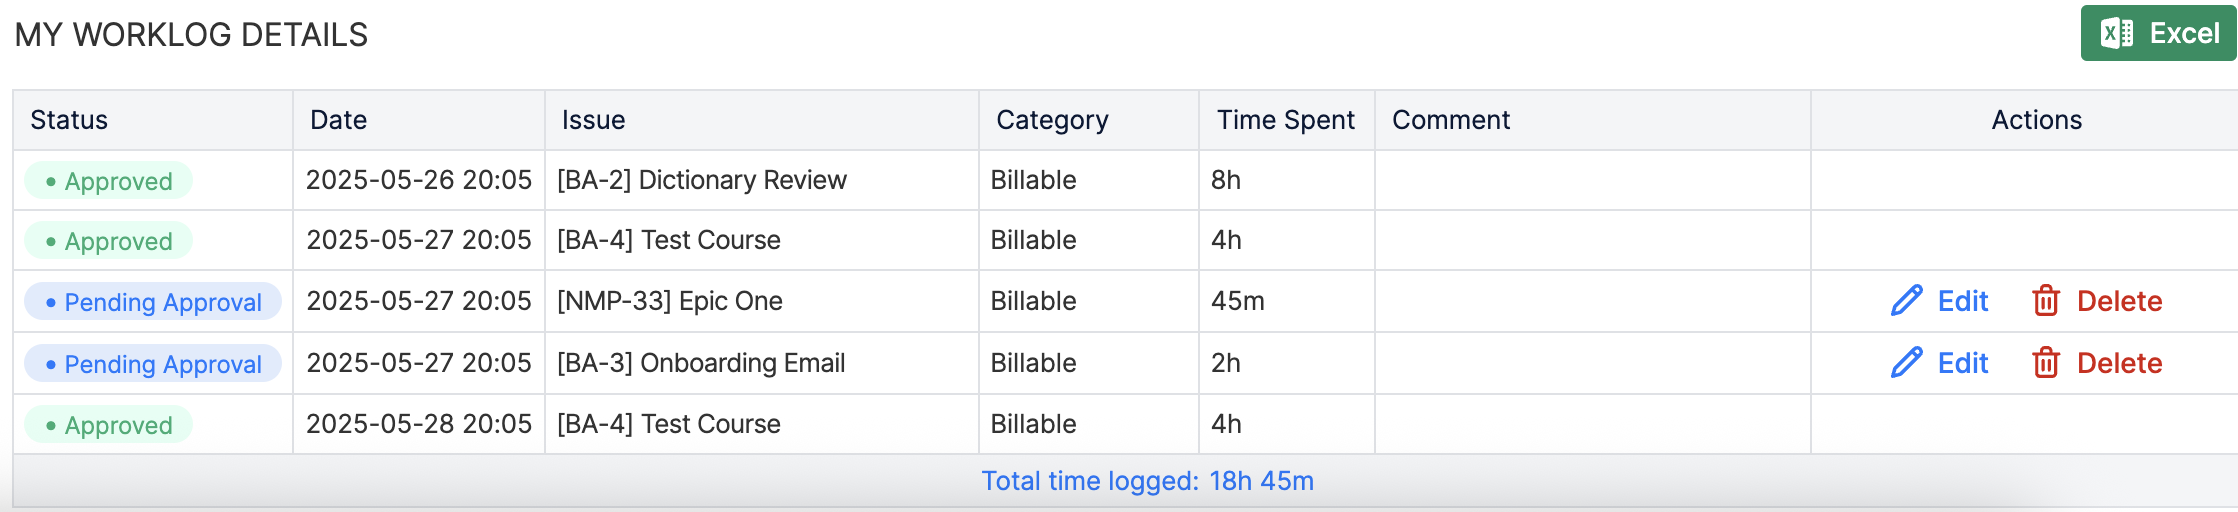
If Timesheet Approval is enabled, only worklogs in Pending Approval status can be edited or deleted. Once a worklog has been approved, it becomes locked and can no longer be modified.
Action Panel
The top toolbar in Workspace gives quick access to the main actions.
-
User Selector is available only for:
-
Managers
-
Team Leads
-
Administrators
It allows these roles to switch between users and view the Workspace of other team members.
-
-
Period Switcher allows you to change the timeline scope:
-
Week
-
Two Weeks
-
Month
-
-
Use the navigation controls to move through time:
-
Next Day — move to the following day
-
Next Week — move to the following week
-
Today — return to the current period
-
-
Log Work button opens the Log Work dialog to record time.
-
Timer icon starts a timer for tracking worklog time in real time.
-
New Task button opens the Create New Item dialog, allowing you to create Jira issues or custom events.
-
Refresh button triggers synchronization and updates Workspace with the latest changes from Jira.
Export to Excel
You can export your worklog data to Excel for reporting or sharing.
To export a worklog table to Excel:
-
Open the Workspace page
-
Choose the scope: Week, Two Weeks, or Month
-
Scroll to the bottom of the page
-
Click the Excel button.

How Workspace Connects to Planner
Planner and Workspace work together:
-
Planner → defines and schedules work
-
Workspace → shows assigned work and tracks execution.
For example:
-
a manager schedules a task in Planner,
-
the task appears in the user’s Workspace,
-
the user completes the work and logs time,
-
the data is reflected in Timesheets and Reports.
Why This Matters
Workspace helps users stay focused, organized, and accountable for their work.
It provides a clear view of:
-
what needs to be done,
-
what is planned,
-
what has already been completed.
Instead of navigating multiple Jira views, users can manage their daily work in one place.
To explore Workspace features in more detail, see: Workspace Documentation.