

The Situation
Some specialists contribute to several projects or teams at the same time.
For example, one designer may support three product teams, a QA engineer may work across several releases, or a solution architect may be requested by multiple project managers.
When each project is planned separately, it is easy to overlook the specialist’s other commitments and assign more work than they can realistically complete.
The Primary Goal
See all commitments for shared specialists in one place, resolve competing project demand, and distribute their available capacity according to business priorities.
What You’ll Use
|
Feature |
Purpose |
|---|---|
|
Users and multiple-team selection |
Display all shared specialists and their assignments |
|
Group specialists automatically by position or skill |
|
|
Identify overbooking and remaining availability |
|
|
Divide one Jira issue between multiple contributors |
|
|
Forecast workload and capacity per person |
|
|
Review how resources are allocated by project |
|
|
Compare time distribution across projects |
Before You Begin
Make sure that:
-
all relevant Jira projects are enabled in ActivityTimeline;
-
the specialists are available in the correct ActivityTimeline teams;
-
users have accurate workload and holiday schemes;
-
Jira issues have estimates and planning dates;
-
vacations, days off, bookings, and other capacity-reducing activities are included in the schedule.
A user can belong to several ActivityTimeline teams. Their timeline still shows their complete schedule, making it possible to identify conflicts between different teams and projects.
Learn more: Users and Teams in Planner
Step 1: Create a View of the Shared Specialists
Open ActivityTimeline → Planner and switch to the Users view.
Choose the most suitable way to display the specialists:
Select Individual Users
Use this option when you need to review a small number of specific people.
-
Open the Users & Teams selector.
-
Search for the required specialists.
-
Select several users to display their timelines together.
Select Multiple Teams
Use this option when specialists contribute to several existing teams.
-
Open the Users & Teams selector.
-
Select all relevant teams.
-
ActivityTimeline will display the members of the selected teams together.
If the same user belongs to several selected teams, their schedule remains available as one complete timeline.
Use a Functional Team
Use this option when you regularly plan resources based on their position or skills.
For example, you can create a Functional Team that automatically includes:
-
all QA engineers;
-
all UX designers;
-
all solution architects;
-
users with a specific technical skill.
Functional Teams are created automatically from the positions or skills assigned to users. This is useful when the specialists belong to different delivery teams but need to be managed as one resource pool.
Step 2: Review Existing Commitments
Choose a period that matches your planning horizon, such as the next four weeks or the next quarter.
Review each specialist’s timeline for:
-
Jira issues from all projects;
-
Bookings and Placeholders;
-
meetings or imported calendar events;
-
vacations, holidays, and days off;
-
other scheduled responsibilities.
Switch the workload indicator to Availability to see how much unallocated capacity remains.
The indicator helps you quickly identify whether a specialist is:
-
available for additional work;
-
appropriately allocated;
-
overloaded during part or all of the selected period.
Do not review only the tasks belonging to the new project. The purpose of this step is to understand the person’s complete workload before making another commitment.
Step 3: Compare Demand from Different Projects
Use the Issues Panel to find work that still needs to be scheduled.
You can:
-
filter issues by project;
-
apply a Jira filter;
-
group issues by project, Epic, sprint, priority, or another available field;
-
search for a specific issue;
-
review whether an issue is already scheduled.
Compare the requested work with the specialist’s remaining availability.
When several projects need the same person at the same time, decide:
-
which work has the highest priority;
-
which deadline is fixed;
-
whether part of the work can move to another period;
-
whether another qualified specialist is available;
-
whether the work can be divided between several people.
This prioritization should happen before scheduling additional work.
Step 4: Resolve Conflicting Assignments
Depending on the situation, use one or more of the following approaches.
Reassign the Work
Move the Jira issue to another available specialist with the required skills.
After reassigning it, review the workload indicators of both users to confirm that the change improves the overall balance.
Reschedule Lower-Priority Work
Move flexible work to a later period when the specialist has more availability.
If several assignments need to move, use Bulk Reschedule to shift or reassign them together.
Reserve Time with a Placeholder
If the future work is not confirmed, create a Placeholder instead of immediately updating the Jira issue.
The Placeholder reserves the specialist’s capacity while keeping the plan tentative. Once the assignment is confirmed, approve the Placeholder to replace it with the linked Jira issue.
Split the Work Between Several People
If several specialists need to contribute to the same Jira issue, split it into Issue Parts.
-
Click the issue on the timeline.
-
Select Split.
-
Create a new Issue Part.
-
Choose another assignee.
-
Define the dates and estimate for that person’s contribution.
-
Save the changes.
Each Issue Part has its own assignee, dates, and estimate while remaining connected to the original Jira issue.
Important: Issue splitting is not supported for issues estimated in story points.
Learn more: Split Jira Issues
Step 5: Verify the Future Allocation
After resolving the conflicts, use planning reports to confirm that the allocation is realistic.
Resource Utilization Forecast
Open Reports → Resource Utilization Forecast.
Configure the report using:
-
Period: your planning horizon;
-
Teams / People: the shared specialists or their Functional Team;
-
Report By: all work, selected projects, an Epic, or a Jira filter;
-
Group By: Project.
The report shows:
-
available capacity;
-
scheduled workload;
-
utilization by person;
-
periods of over- or underutilization;
-
how each person’s planned time is distributed across projects.
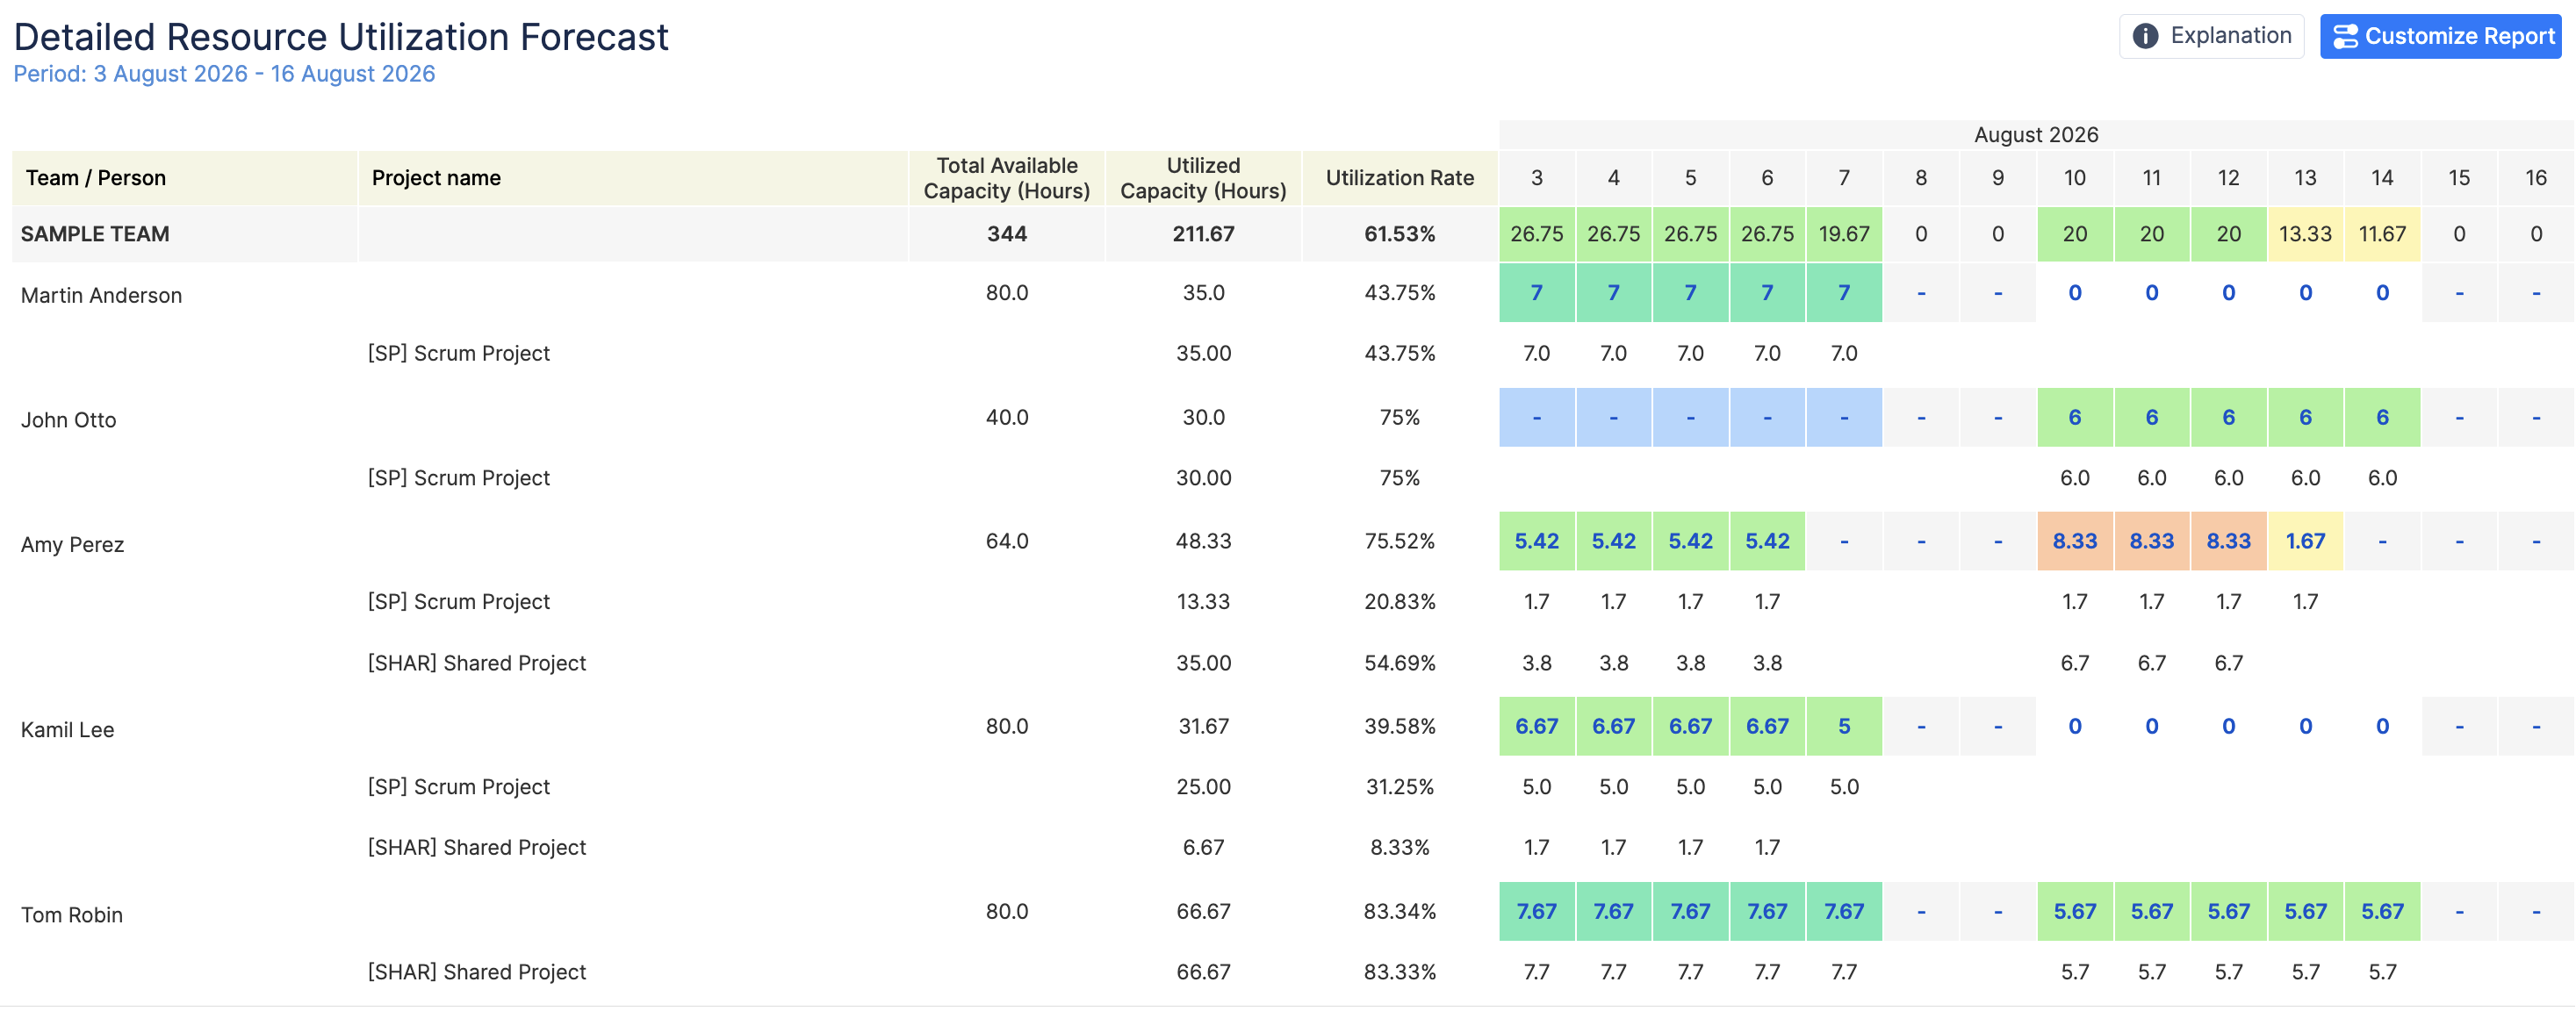
Use this report to confirm that no individual is overloaded and that the planned allocation matches the agreed priorities.
Learn more: Resource Utilization Forecast
Project Resources Forecast
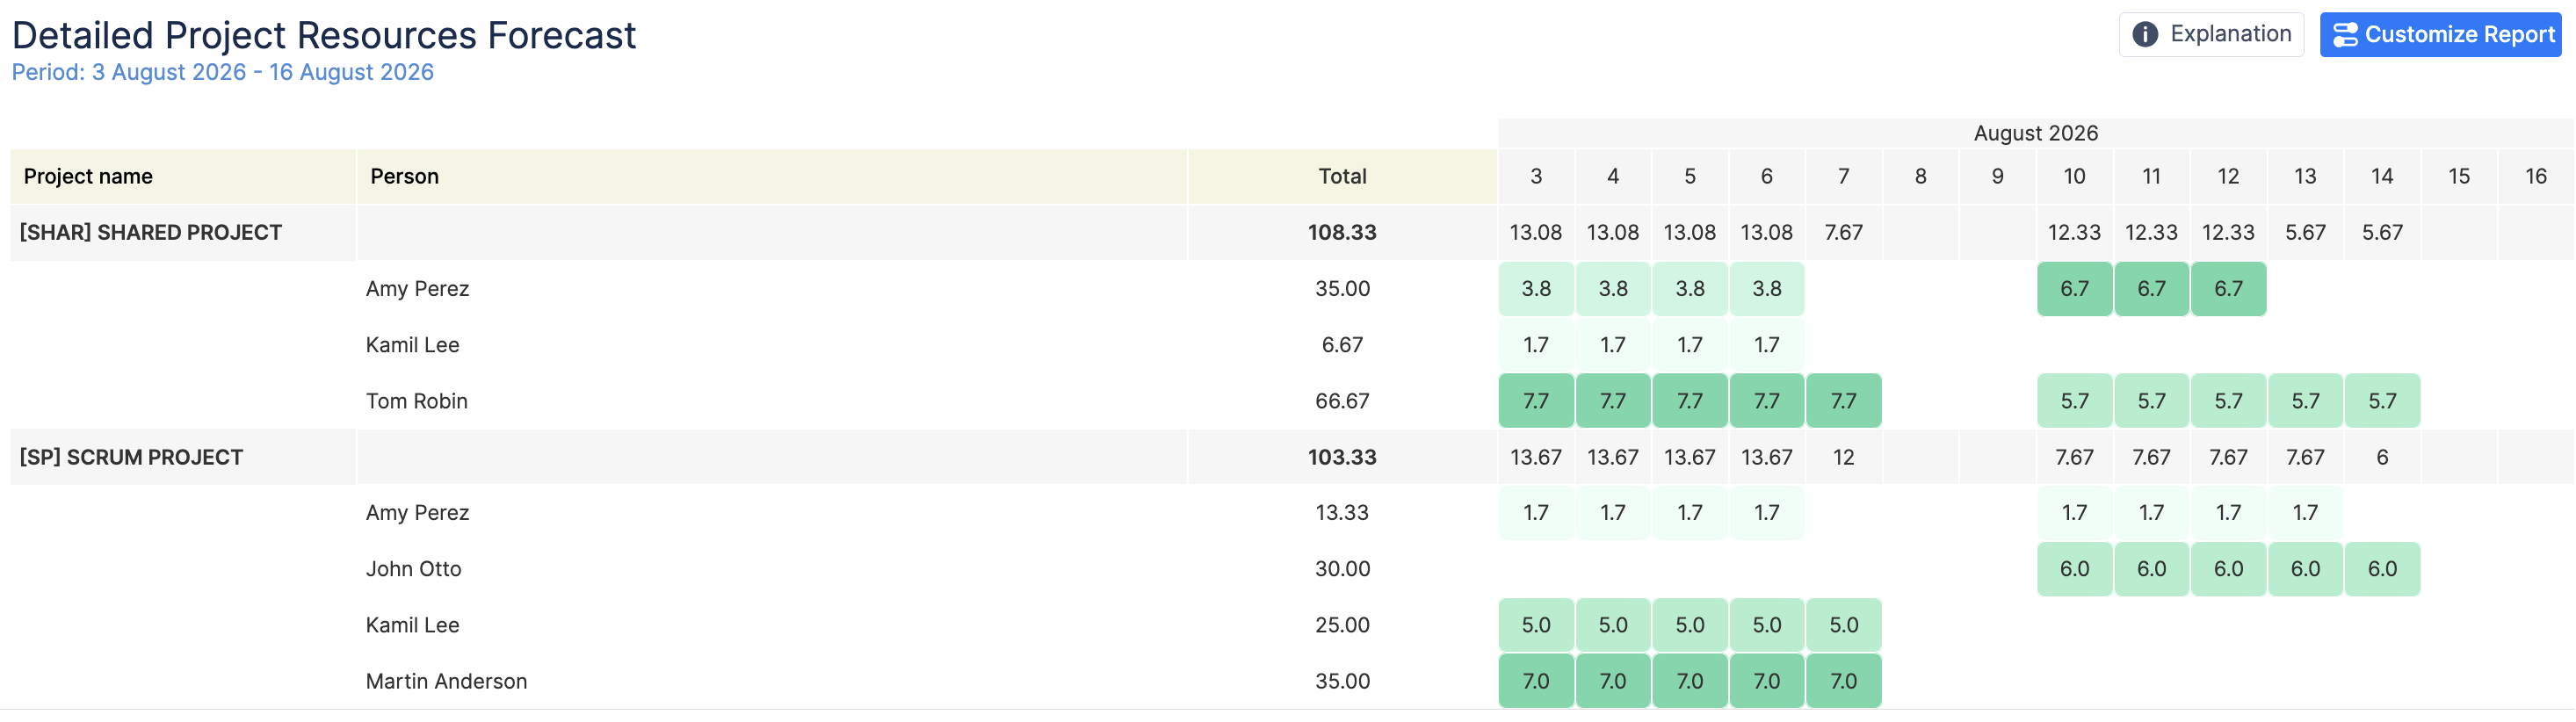
Use the Project Resources Forecast when you want to review the allocation from the project perspective.
The report helps answer:
-
Which specialists are assigned to each project?
-
How many hours are allocated to each person?
-
How does the allocation change from week to week?
-
Does the project have enough committed resources?
Learn more: Project Resources Forecast
Step 6: Review Actual Time Distribution
As the work progresses, specialists log their time from Jira or ActivityTimeline Workspace.
Use Timeline Timesheets or Detailed Timesheets to review how much time was actually spent on each project.
Filter the timesheet by the shared specialists and group the results by Project.
You can also use the Team Utilization Pie Chart to compare:
-
Future utilization: based on estimates, Bookings, Placeholders, and calendar events;
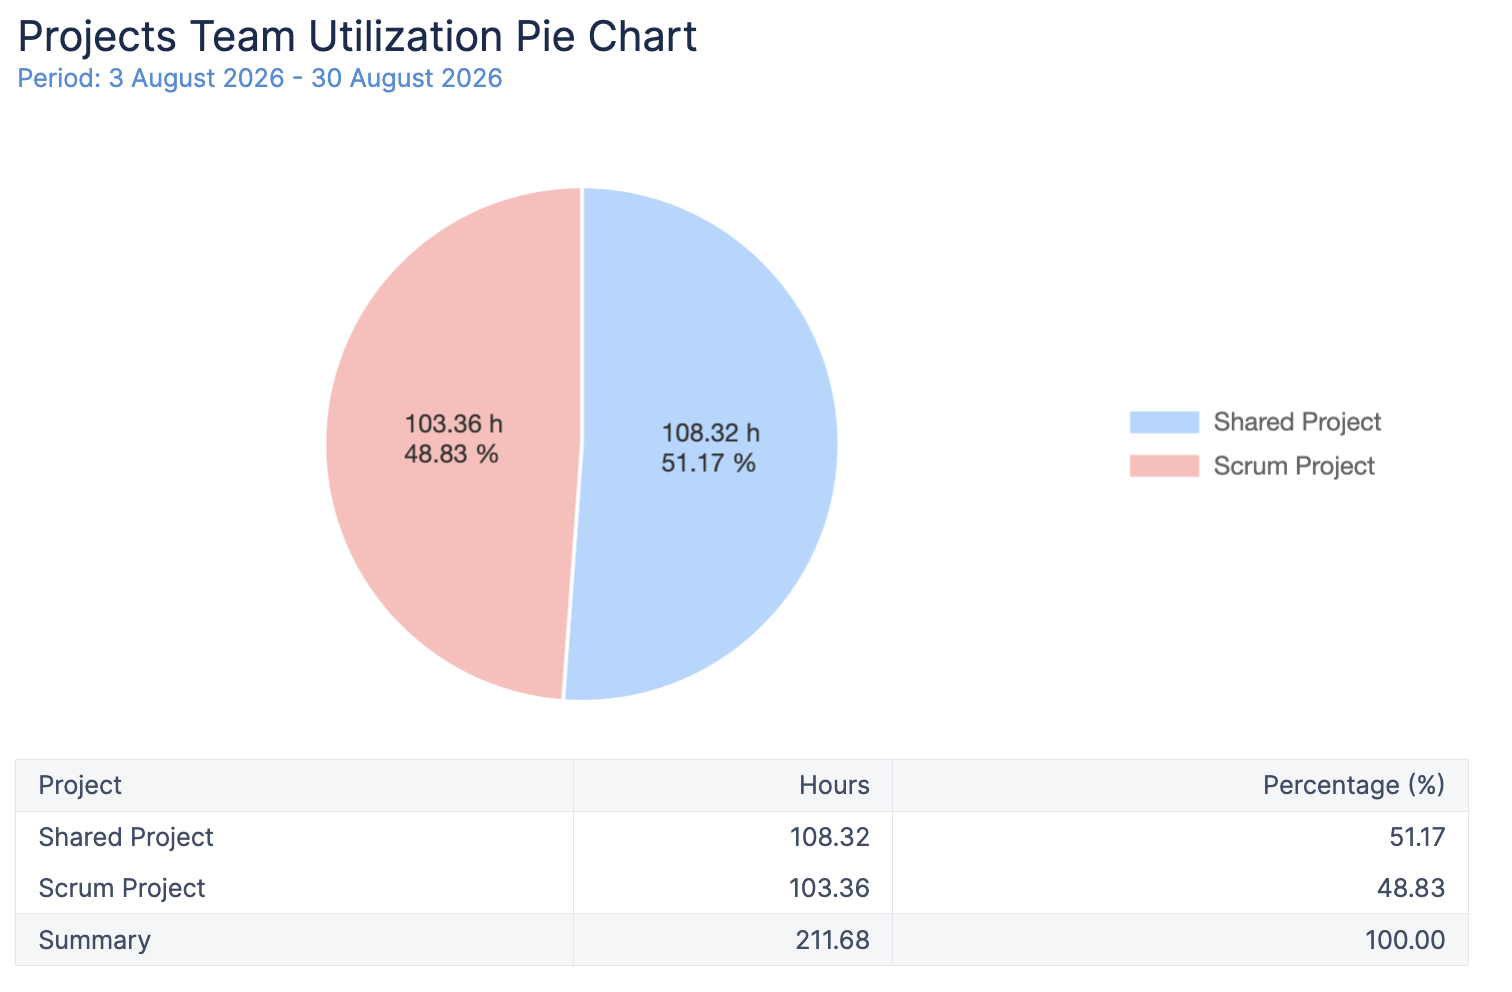
-
Past utilization: based on logged work, Bookings, and imported calendar events.
This helps you understand whether the actual project distribution matched the allocation agreed during planning.
Learn more: Team Utilization Pie Chart
Expected Result
After completing this workflow, you will have:
-
one cross-project view of every shared specialist;
-
visibility into existing assignments and remaining capacity;
-
project conflicts identified before new work is committed;
-
work prioritized, reassigned, rescheduled, or divided where necessary;
-
a forecast showing how capacity is distributed across projects;
-
actual time data that can improve future allocation decisions.