

The Situation
You are preparing an upcoming sprint and need to decide how much work the team can realistically complete.
Looking only at the Jira backlog or previous sprint velocity may not be enough. Team members may have vacations, public holidays, meetings, support responsibilities, or commitments to other projects.
The Primary Goal
Build an achievable sprint plan based on the team’s actual availability, identify overload before the sprint starts, and rebalance work when priorities or capacity change.
What You’ll Use
|
Feature |
Purpose |
|---|---|
|
Display sprint issues across the sprint period |
|
|
View the sprint, its issues, and their statuses |
|
|
Plan at team and individual levels together |
|
|
Identify available, balanced, and overloaded users |
|
|
Workspace and Timesheets |
Track work performed during the sprint |
|
Compare scheduled effort with logged time |
Before You Begin
Make sure that:
-
the team and its members are available in ActivityTimeline;
-
users have the correct workload and holiday schemes;
-
the Jira project is enabled and synchronized;
-
the Jira sprint has Start and End dates;
-
sprint issues have estimates if you want them included in workload calculations.
ActivityTimeline can work with estimates in hours or story points. If your team uses story points, configure the appropriate conversion to hours so the workload can be compared with user capacity.
Important: Sprint Dates and Issue Dates
ActivityTimeline can automatically display assigned issues across the Jira sprint period.
However, mapped issue Start and End Date fields have priority over sprint dates. To plan based on the sprint period, make sure these fields are empty or not mapped for the relevant issues.z
Learn more: Using Sprint Dates for Planning
Step 1: Display the Sprint in Planner
-
Open ActivityTimeline → Planner.
-
Select the relevant team.
-
Switch to Team with Users view to see the Team Panel and individual timelines together.
-
Open the Milestones Panel using the flag icon on the right.
-
Click the cog icon and select the relevant Jira project and Scrum board.
-
Find the sprint and expand it to review its issues and current statuses.
The sprint is displayed across its configured Start and End dates.
Issues assigned to users can automatically appear on their timelines for the sprint period.
You can also drag an issue onto the sprint in the Milestones Panel to update its Sprint field in Jira.
Learn more: Milestones and Sprints on the Milestones Panel
Step 2: Review the Team’s Real Capacity
Before adding or distributing more work, review how much capacity the team actually has.
-
Set the Planner period to match the upcoming sprint.
-
Review the workload indicator for the whole team.
-
Switch the indicator to Total Team Availability to see how much capacity remains after existing assignments and absences.
-
Review individual workload indicators for each team member.
-
Check the timeline for vacations, holidays, days off, bookings, and other activities that affect availability.
The workload indicators help you identify:
-
Light green: the user has available capacity;
-
Green: the workload is balanced;
-
Red: the user is overloaded.
Do not plan the sprint against theoretical capacity alone. Existing work, time off, and other scheduled activities should be included before the team commits to additional issues.
Learn more: Team Panel Workload Modes
Step 3: Assign Sprint Work
There are two common ways to build the detailed sprint plan.
Option 1: Assign Issues Directly to Users
Use this option when you already know who will perform the work.
-
Find the sprint issues in the Issues Panel.
-
Group or filter the panel by Sprint if necessary.
-
Assign the issues to the appropriate users.
-
Review how each assignment changes the user’s workload indicator.
If the issues already have assignees and ActivityTimeline is using sprint dates, they can appear on the corresponding user timelines automatically.
Option 2: Plan at the Team Level First
Use this option when the team is known, but the individual assignees have not yet been selected.
-
Schedule the work on the Team Panel from Planner or Jira using ActivityTimeline Team Field.
-
Use Team Panel Workload to see how much sprint work still needs to be distributed.
-
Review the individual availability of team members.
-
Move the work from the Team Panel to suitable users.
After distributing the work, switch to Total Team Workload to review all sprint commitments, including both team-level and individually assigned work.
Step 4: Rebalance Overloaded Users
If an assignment turns the workload indicator red, adjust the plan before the sprint starts.
Depending on the situation, you can:
-
reassign the issue to another available user;
-
change the scheduled dates;
-
reduce the amount of work included in the sprint;
-
move lower-priority work to a later period;
-
split the issue between several contributors.
To split one Jira issue between multiple users:
-
Click the issue on the timeline.
-
Select Split.
-
Create a new issue part.
-
Select another assignee.
-
Define the dates and estimate for that person’s contribution.
Each issue part can have its own assignee, estimate, and scheduled dates while remaining connected to the original Jira issue.
Learn more: Split Jira Issues
Step 5: Track Execution During the Sprint
Once the sprint starts, team members can review their assignments and log time from Workspace.
Users can log work by:
-
clicking Log Work;
-
opening a scheduled issue and selecting Log Work;
-
using the Timer;
-
clicking the Daily Logged Hours chart;
-
adding or adjusting worklogs on their Workspace timeline.
Managers can use Progress Timesheets to check:
-
required hours;
-
logged hours;
-
missing time;
-
planned versus logged time;
-
timesheet approval progress, if approval is enabled.
This helps identify reporting gaps before the sprint ends.
Step 6: Compare the Plan with the Result
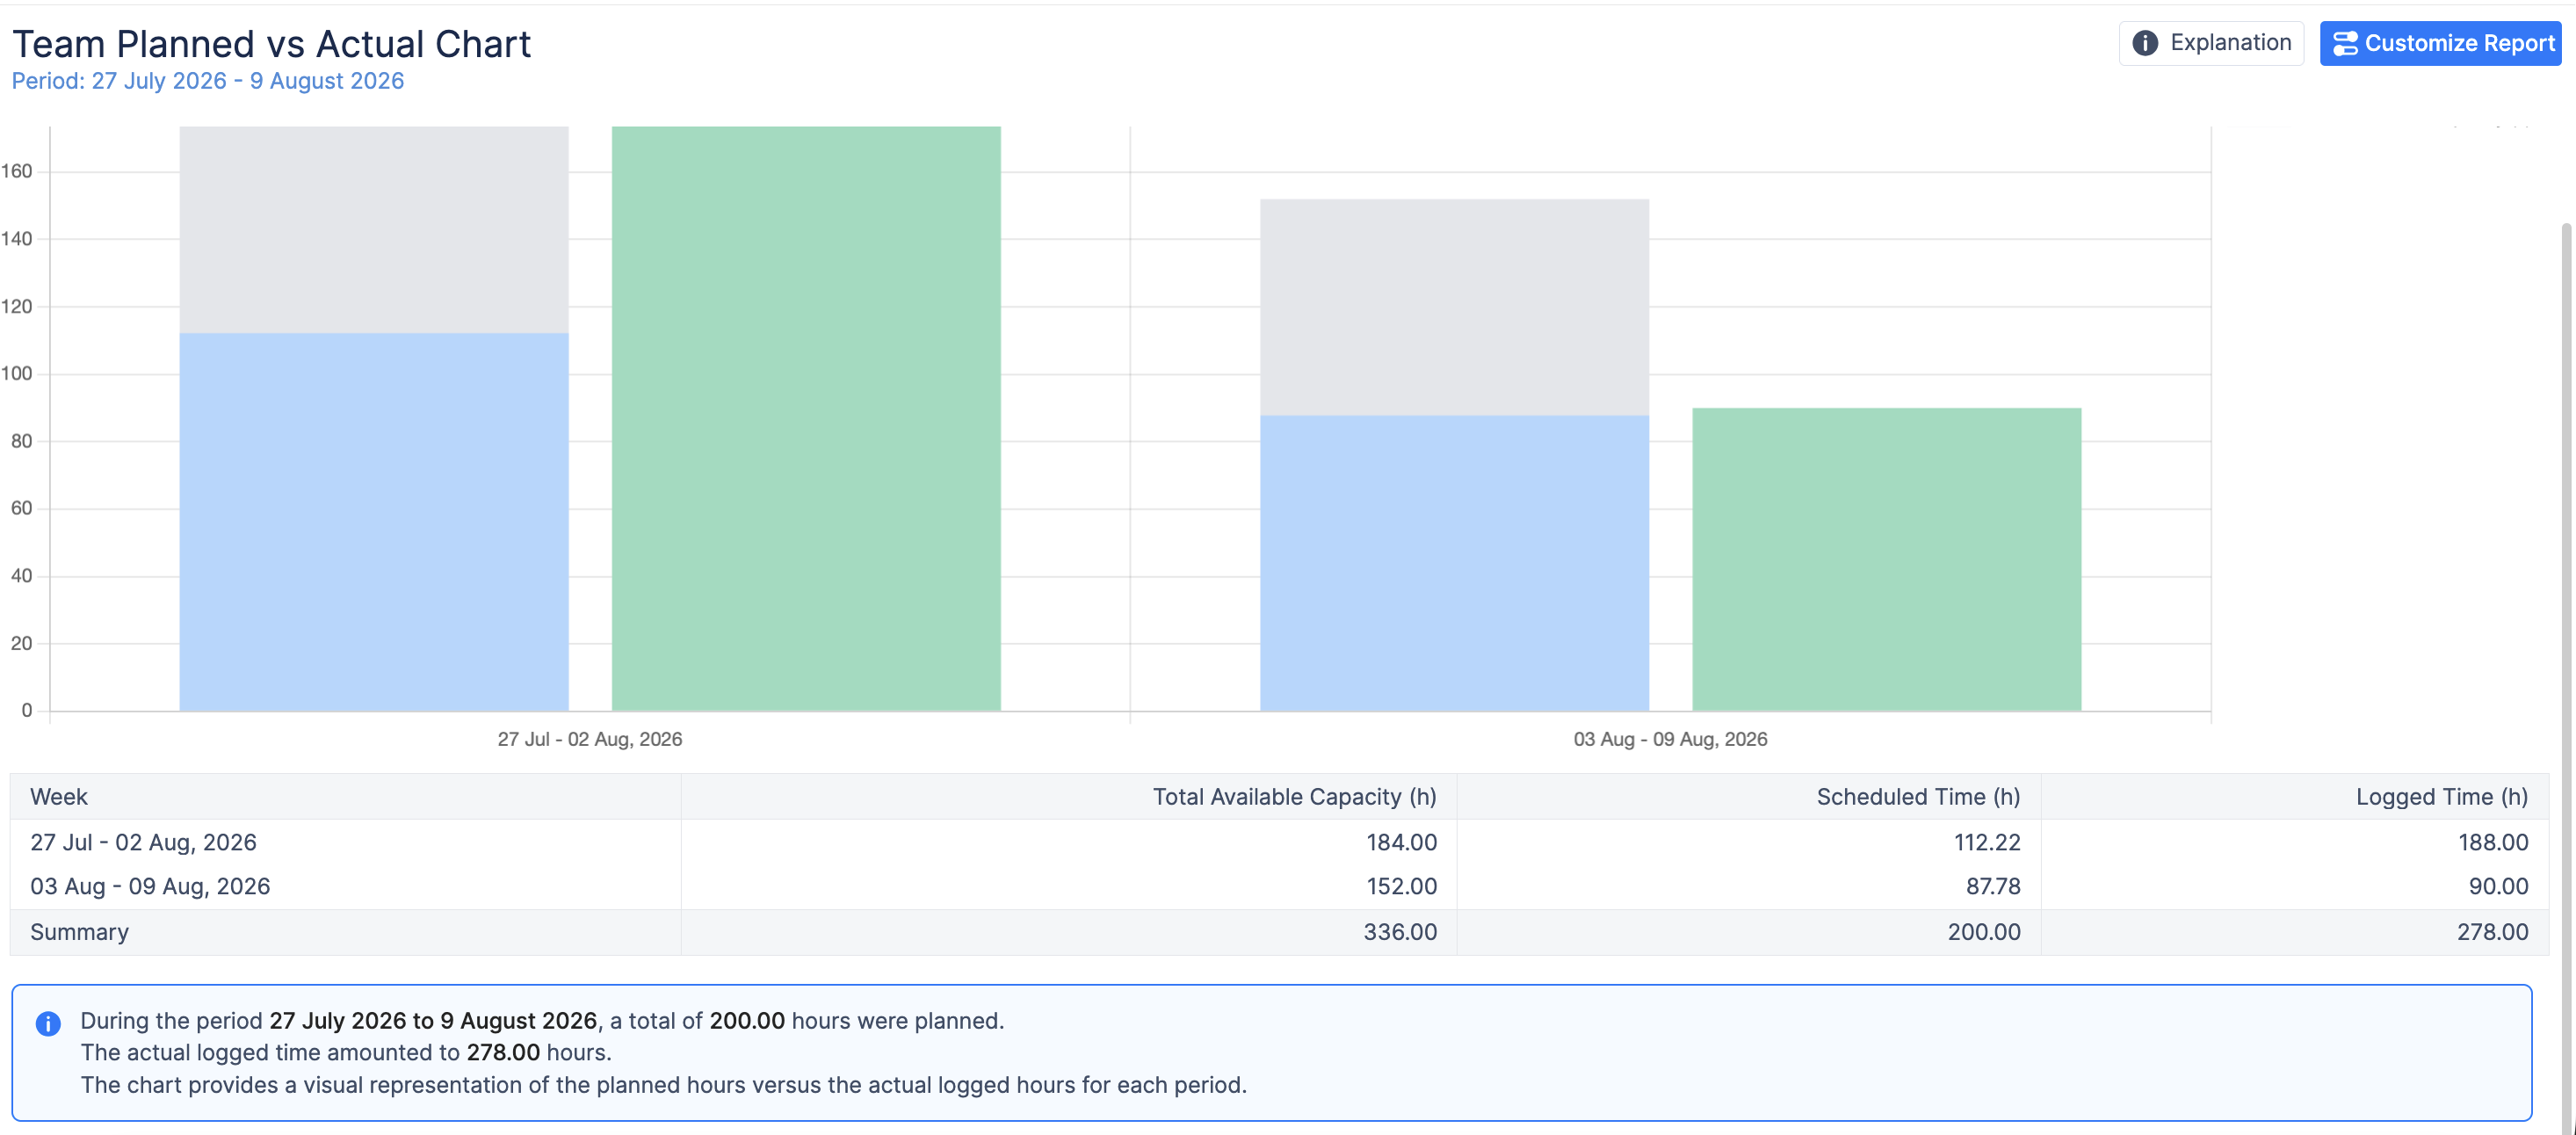
After the sprint, open Reports → Planned vs Actual Chart.
Configure the chart using:
-
Period: the sprint Start and End dates;
-
Report By: Team;
-
Team: the team that completed the sprint;
-
Units: Week, or another suitable unit for the sprint duration.
The chart compares:
-
available team capacity;
-
scheduled time based on estimates and planned events;
-
time actually logged by the team.
Use the result to answer:
-
Did the team commit to more work than its capacity allowed?
-
Was significantly more time logged than planned?
-
Which work was underestimated?
-
Was capacity reduced by unplanned support or other activities?
-
Should the next sprint include a larger capacity buffer?
For issue-level analysis, use the Planned vs Actual Report to identify specific issues that required more effort than originally estimated.
Learn more:
Expected Result
After completing this workflow, you will have:
-
a sprint plan based on real team and individual availability;
-
visible workload conflicts before the sprint begins;
-
work distributed between suitable team members;
-
a clear record of planned and logged time;
-
data that can improve estimates and capacity decisions for the next sprint.
By default, Issue Start/End Date Fields in ActivityTimeline have higher priority than sprint dates. To display issues on the timeline based on sprint dates, please ensure that the Issue Start/End Dates are either empty in Jira or not mapped in ActivityTimeline.
If you would like ActivityTimeline to always show tasks based on sprint dates (If sprint is indicated), please, navigate to Configurations → Advanced Settings → Custom Functionality → Paste the following text PRIORITIZE_SPRINT_DATES → Click 'Update'.
Once enabled when dragging and dropping tasks from the issue panel to a user, or from user to user, the behavior has been updated as follows: initially, the task will be displayed for the dates you dropped it for.
However, after clicking "Refresh" at the top right corner, the task will then reflect the dates of the sprint.