If you are new to the Finances module, this step-by-step guide will walk you through the fastest way to create your first budget, configure your rates, and generate your first financial report.
Step 1: Create and Scope Your Budget
The first step is to create the financial container and tell ActivityTimeline which Jira issues to track.
-
Navigate to Finances in the top ActivityTimeline menu.
-
Click the blue + Create budget button in the top right corner.
-
Name your budget and select the Time Period you want to track.
-
Define your Scope (Choose between Jira Projects, Epics, or a JQL filter) and select the specific items. (Read more about scoping in Basic Concepts & Terms: Finances | The Budget (Project)).
-
Choose your Budget Type. For this quick start, select Manual Budget and enter your total budget amount (e.g., 50,000).
-
Click Create.
Step 2: Define Labor Rates
Your budget now has a Default Cost and Billing Rate (set during creation), but you likely have team members with different hourly costs. To ensure accurate financial tracking, you need to assign specific rates to the people working on this budget.
-
After creating your budget, open that budget project and go to its Configuration page.
-
Click on the Labor rates tab in the left-hand menu.
-
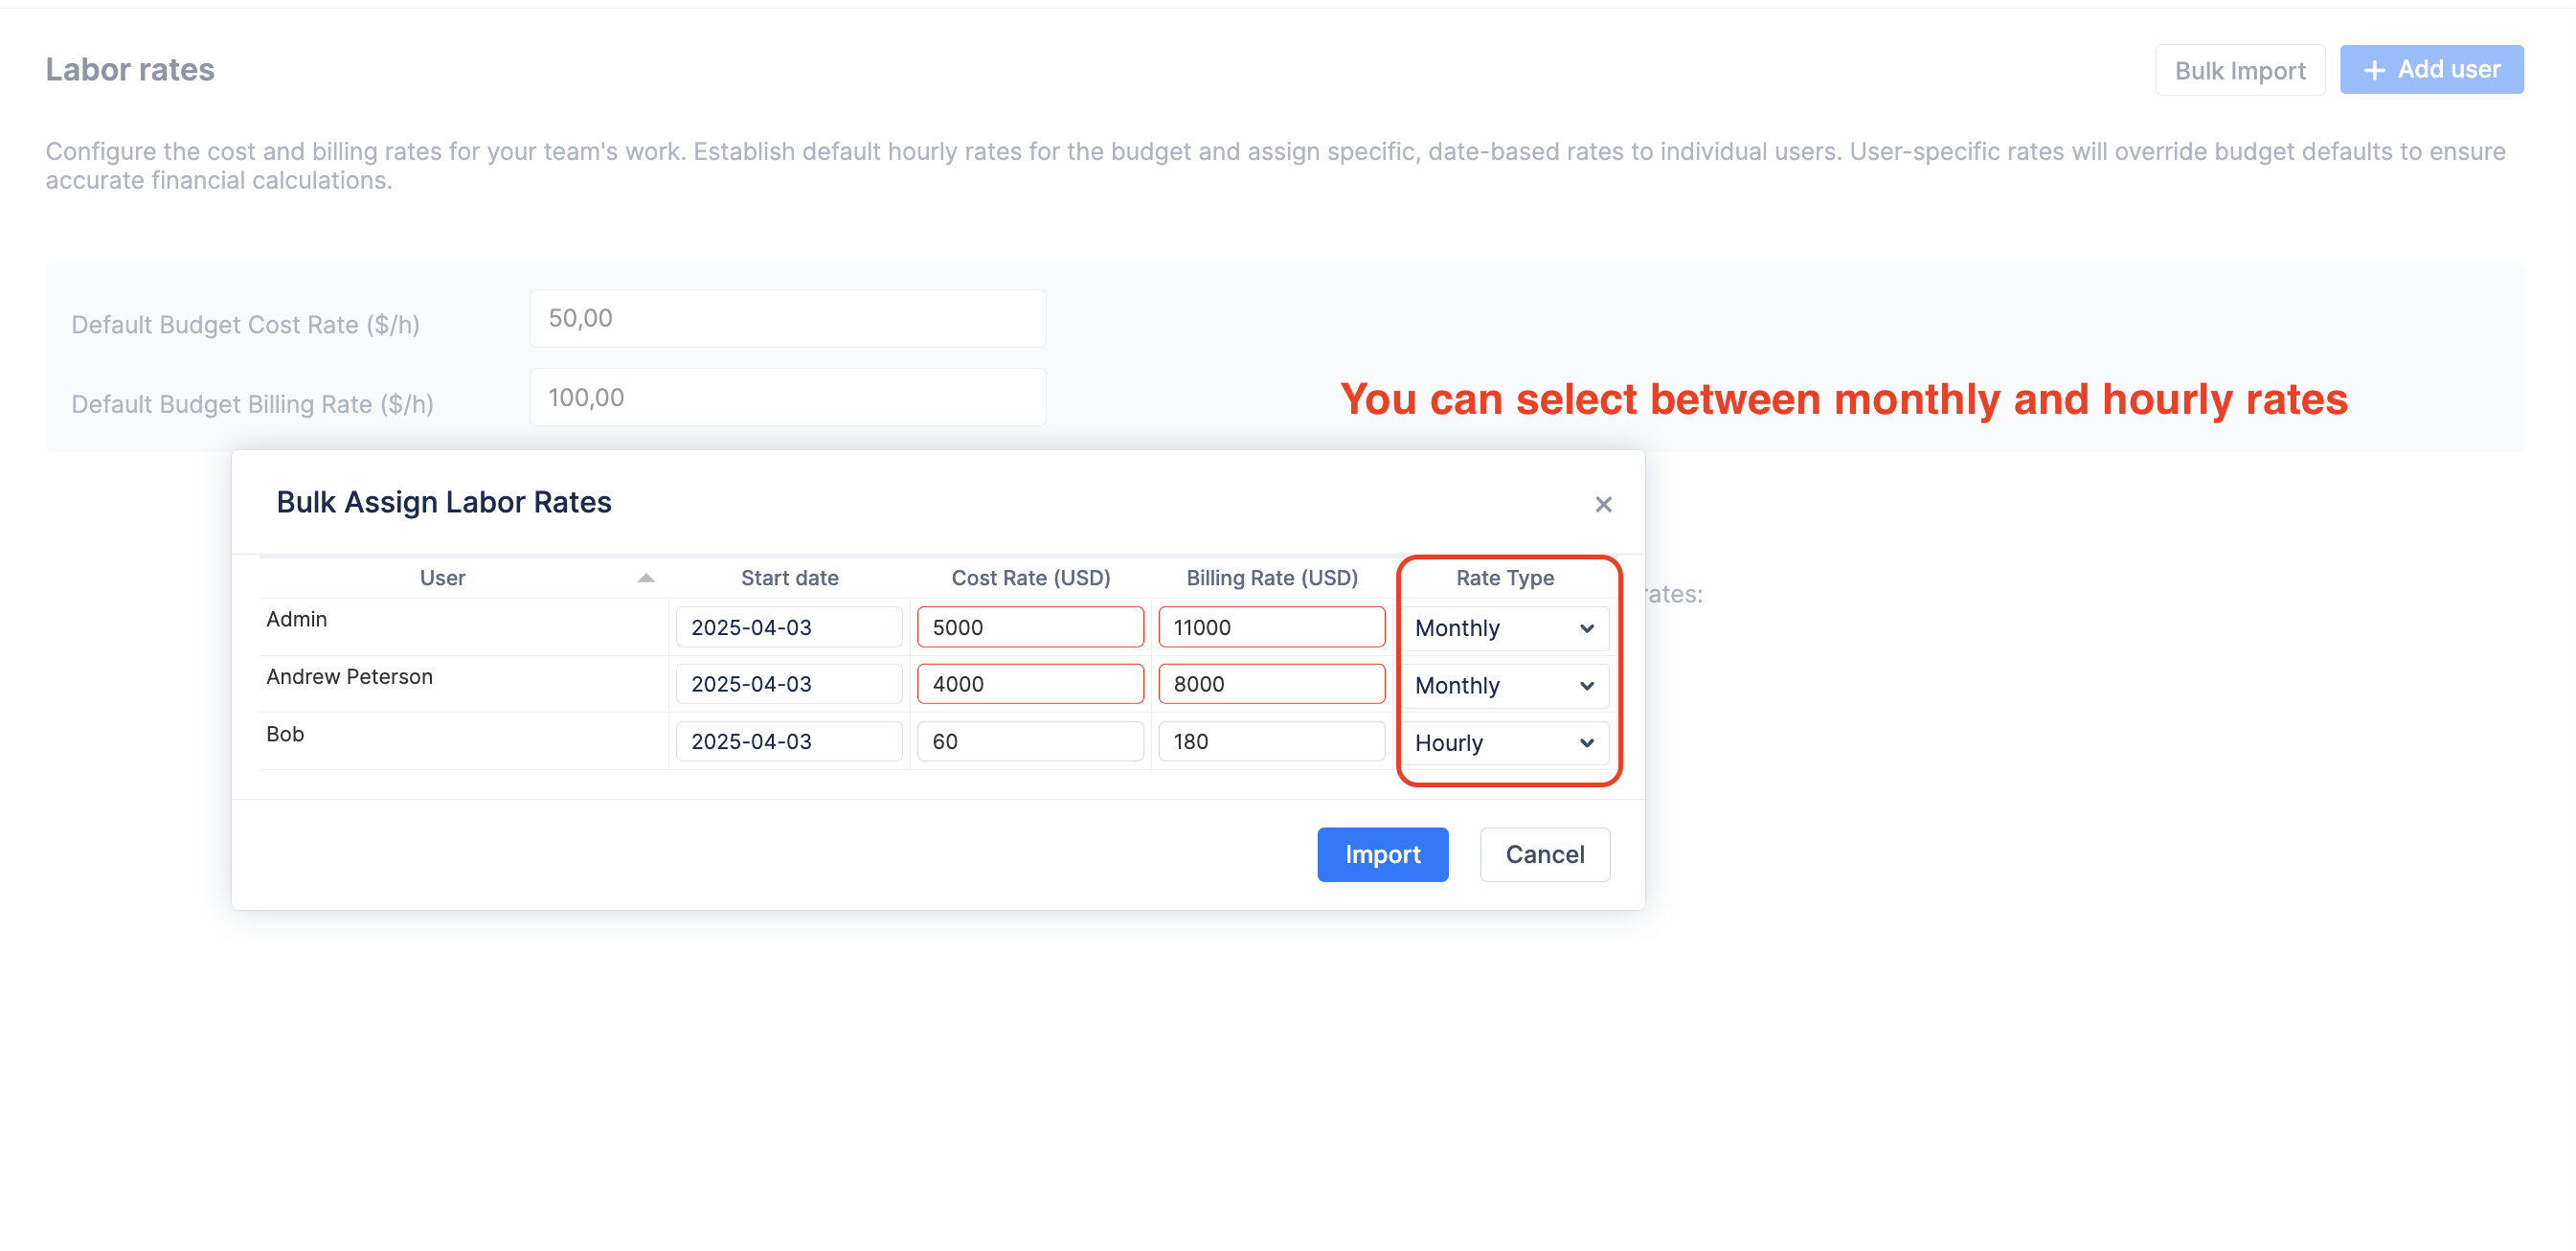
To quickly add your team, click the Bulk import button.
-
Select whether you want to import users from a Jira Group or an existing ActivityTimeline Team, then choose the specific group from the dropdown and click Next.
-
In the Bulk Assign window, you can review the list of imported users. By default, they are set to "Inherit" the budget's default rates.
-
Click into the Cost Rate or Billing Rate fields to inline-edit and assign specific hourly rates to individual users.
-
Click Import to save.
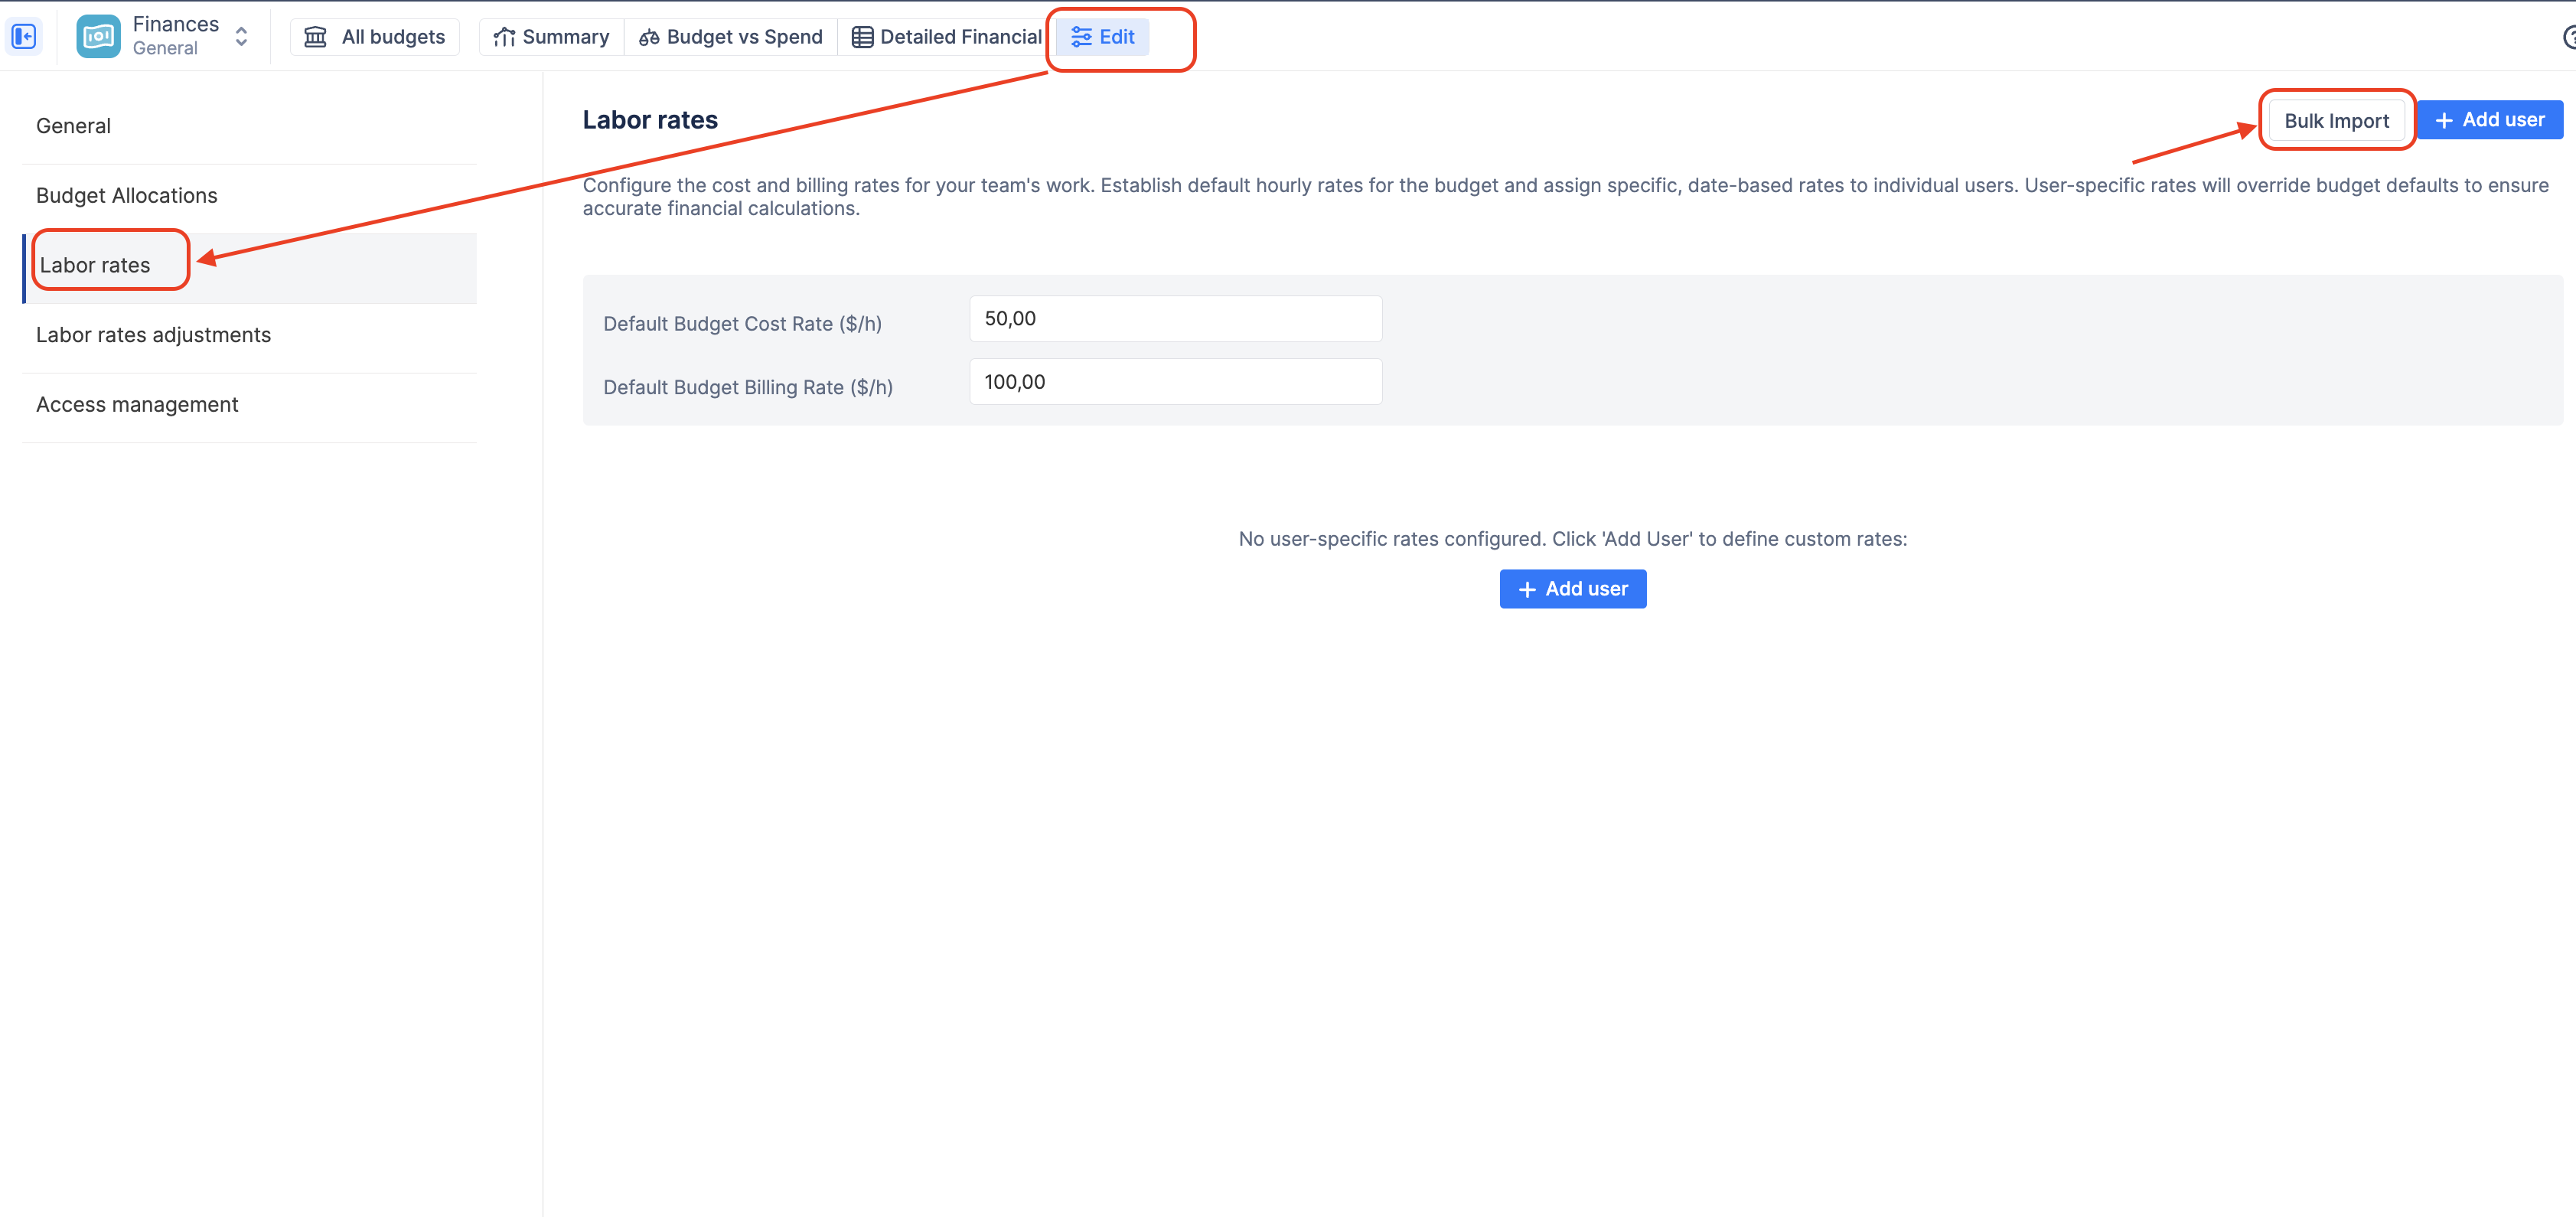
💡 Note: The system uses a strict hierarchy. If a user logs time, ActivityTimeline will use their specific User Rate. If they don't have one, it falls back to the Default Budget Rate. (Learn more in Basic Concepts & Terms: Finances | Labor Rates).
Step 3: Set Budget Allocations (Targets)
Your total budget is just one number (e.g., $50,000), but to manage a project effectively, you need to understand how you intend to spend that money across different areas.
Setting Budget Allocations allows you to define these strategic targets. By manually splitting your budget by specific criteria (like Category or Project), you create a baseline to compare against your team's actual spending.
-
Click on the Budget Allocations tab on the left menu.
-
Click + Add Allocations.
-
Choose a dimension to group your budget by. For example, selecting Category allows you to set targets for Billable vs. Non-Billable work, while selecting Project lets you distribute funds across multiple Jira projects within this budget.
-
Enter the monetary amount or percentage you want to allocate to each item. The system will automatically calculate the inverse (e.g., typing 50% will calculate $25,000). Ensure your summary totals 100% of your Total Budget.
-
Click Update.
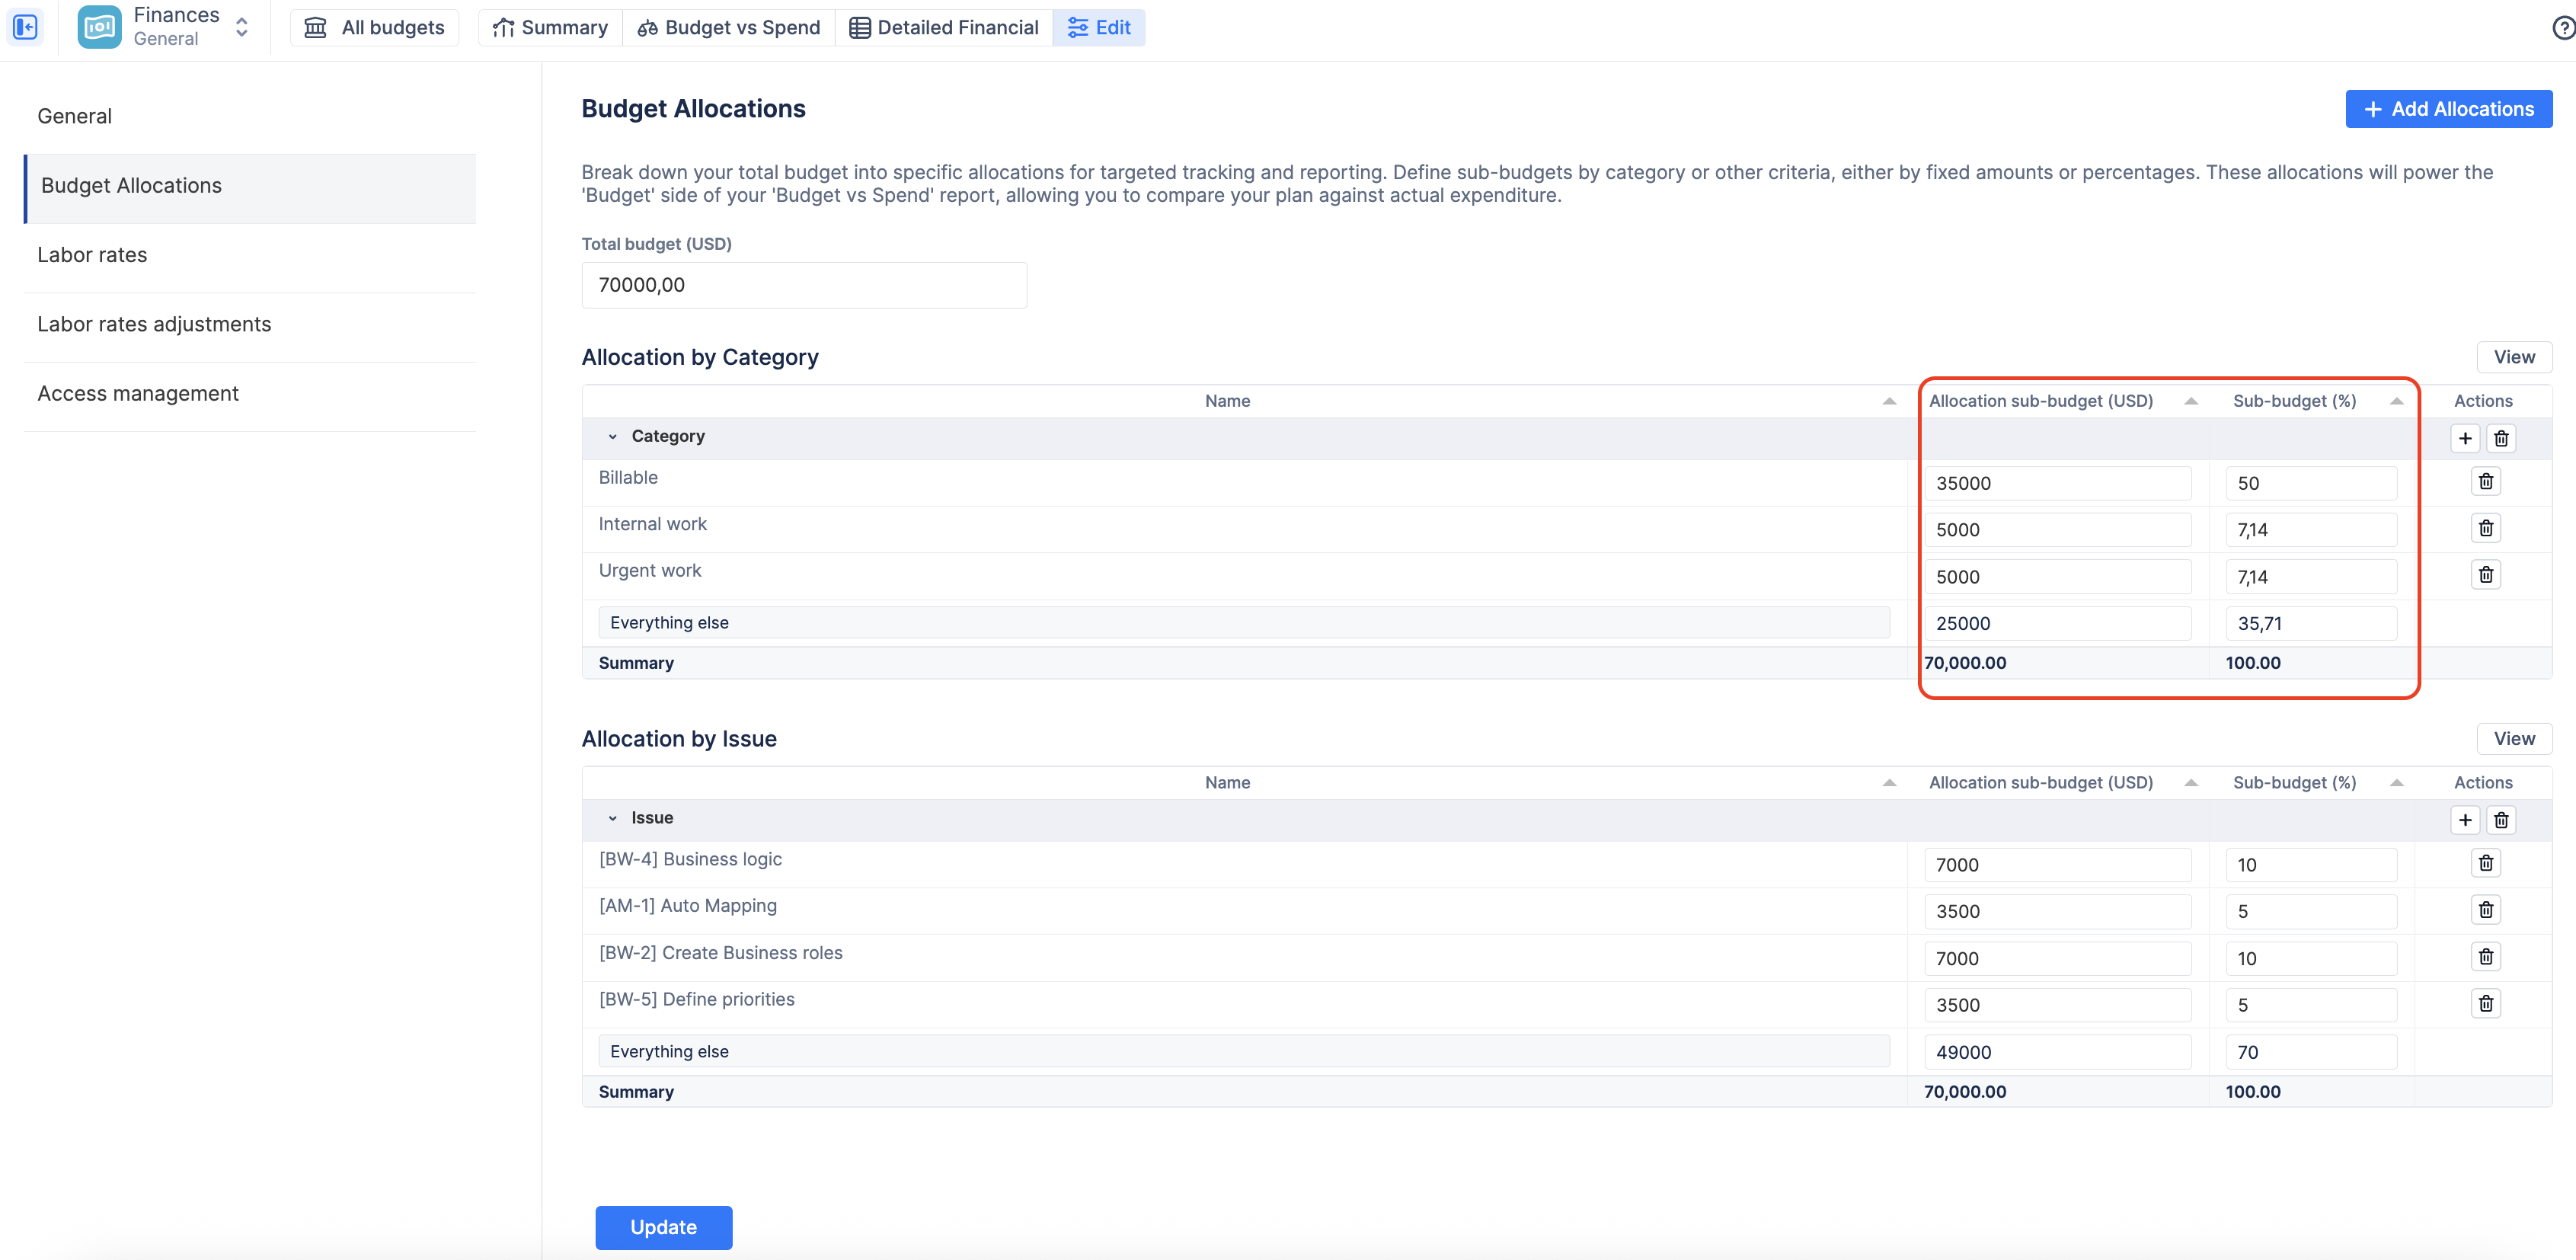
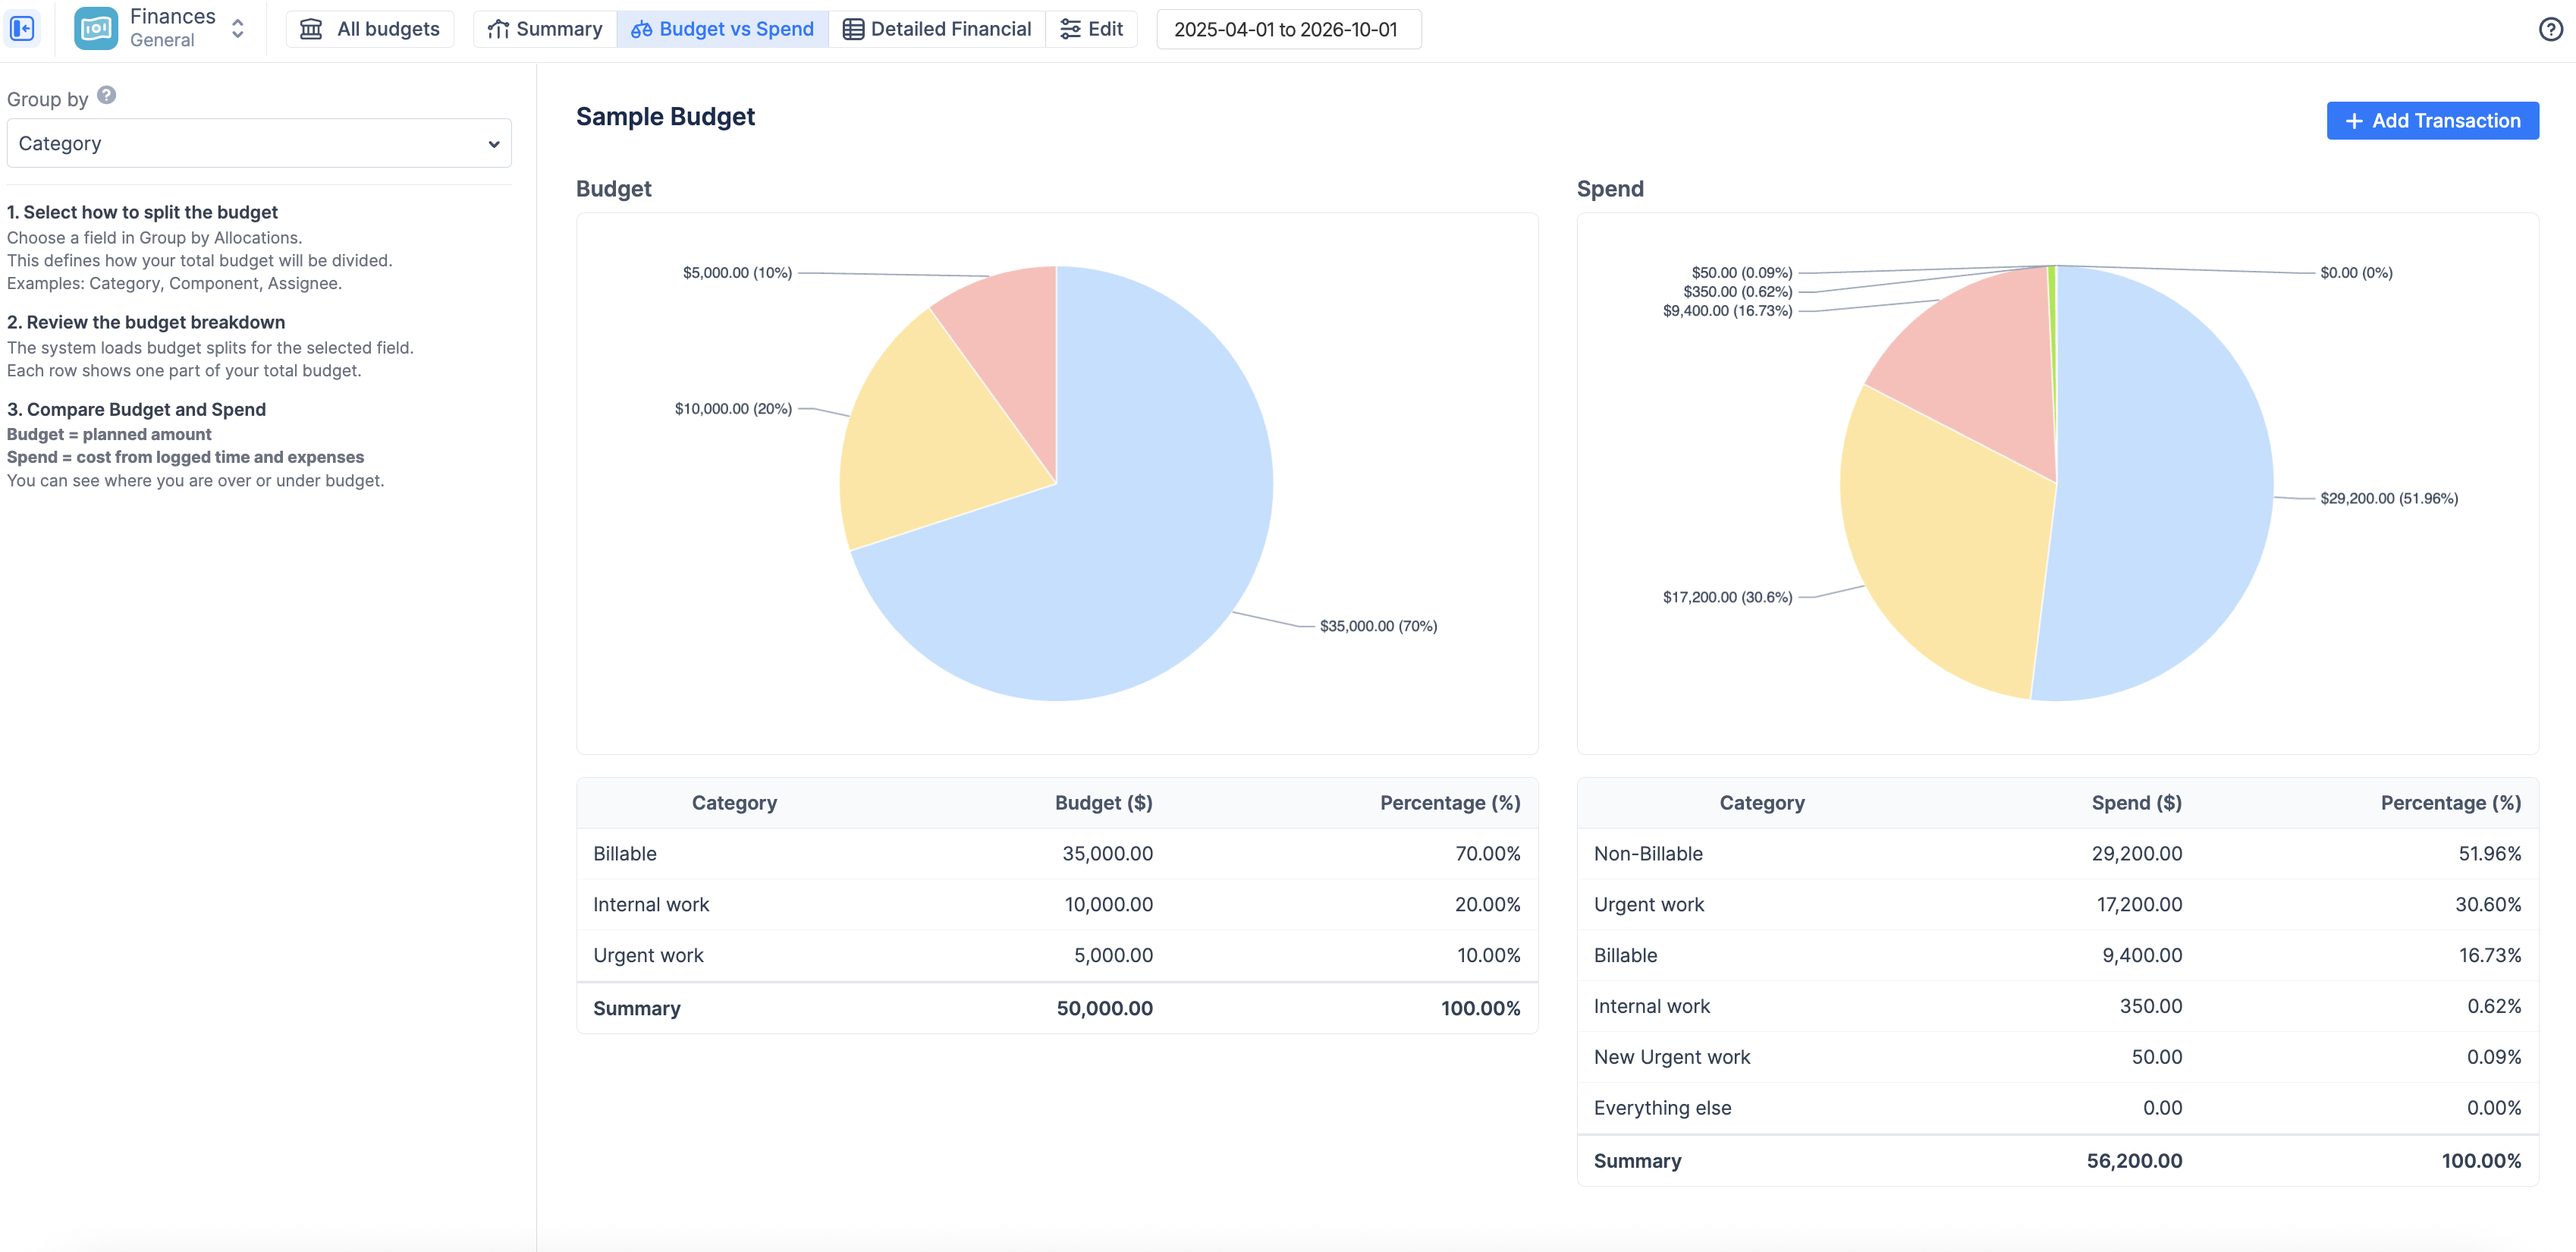
💡 Note: These manual targets directly power the "Budget" (left side) of your Budget vs Spend report. If you skip this step, that chart will display a "No data source" warning.
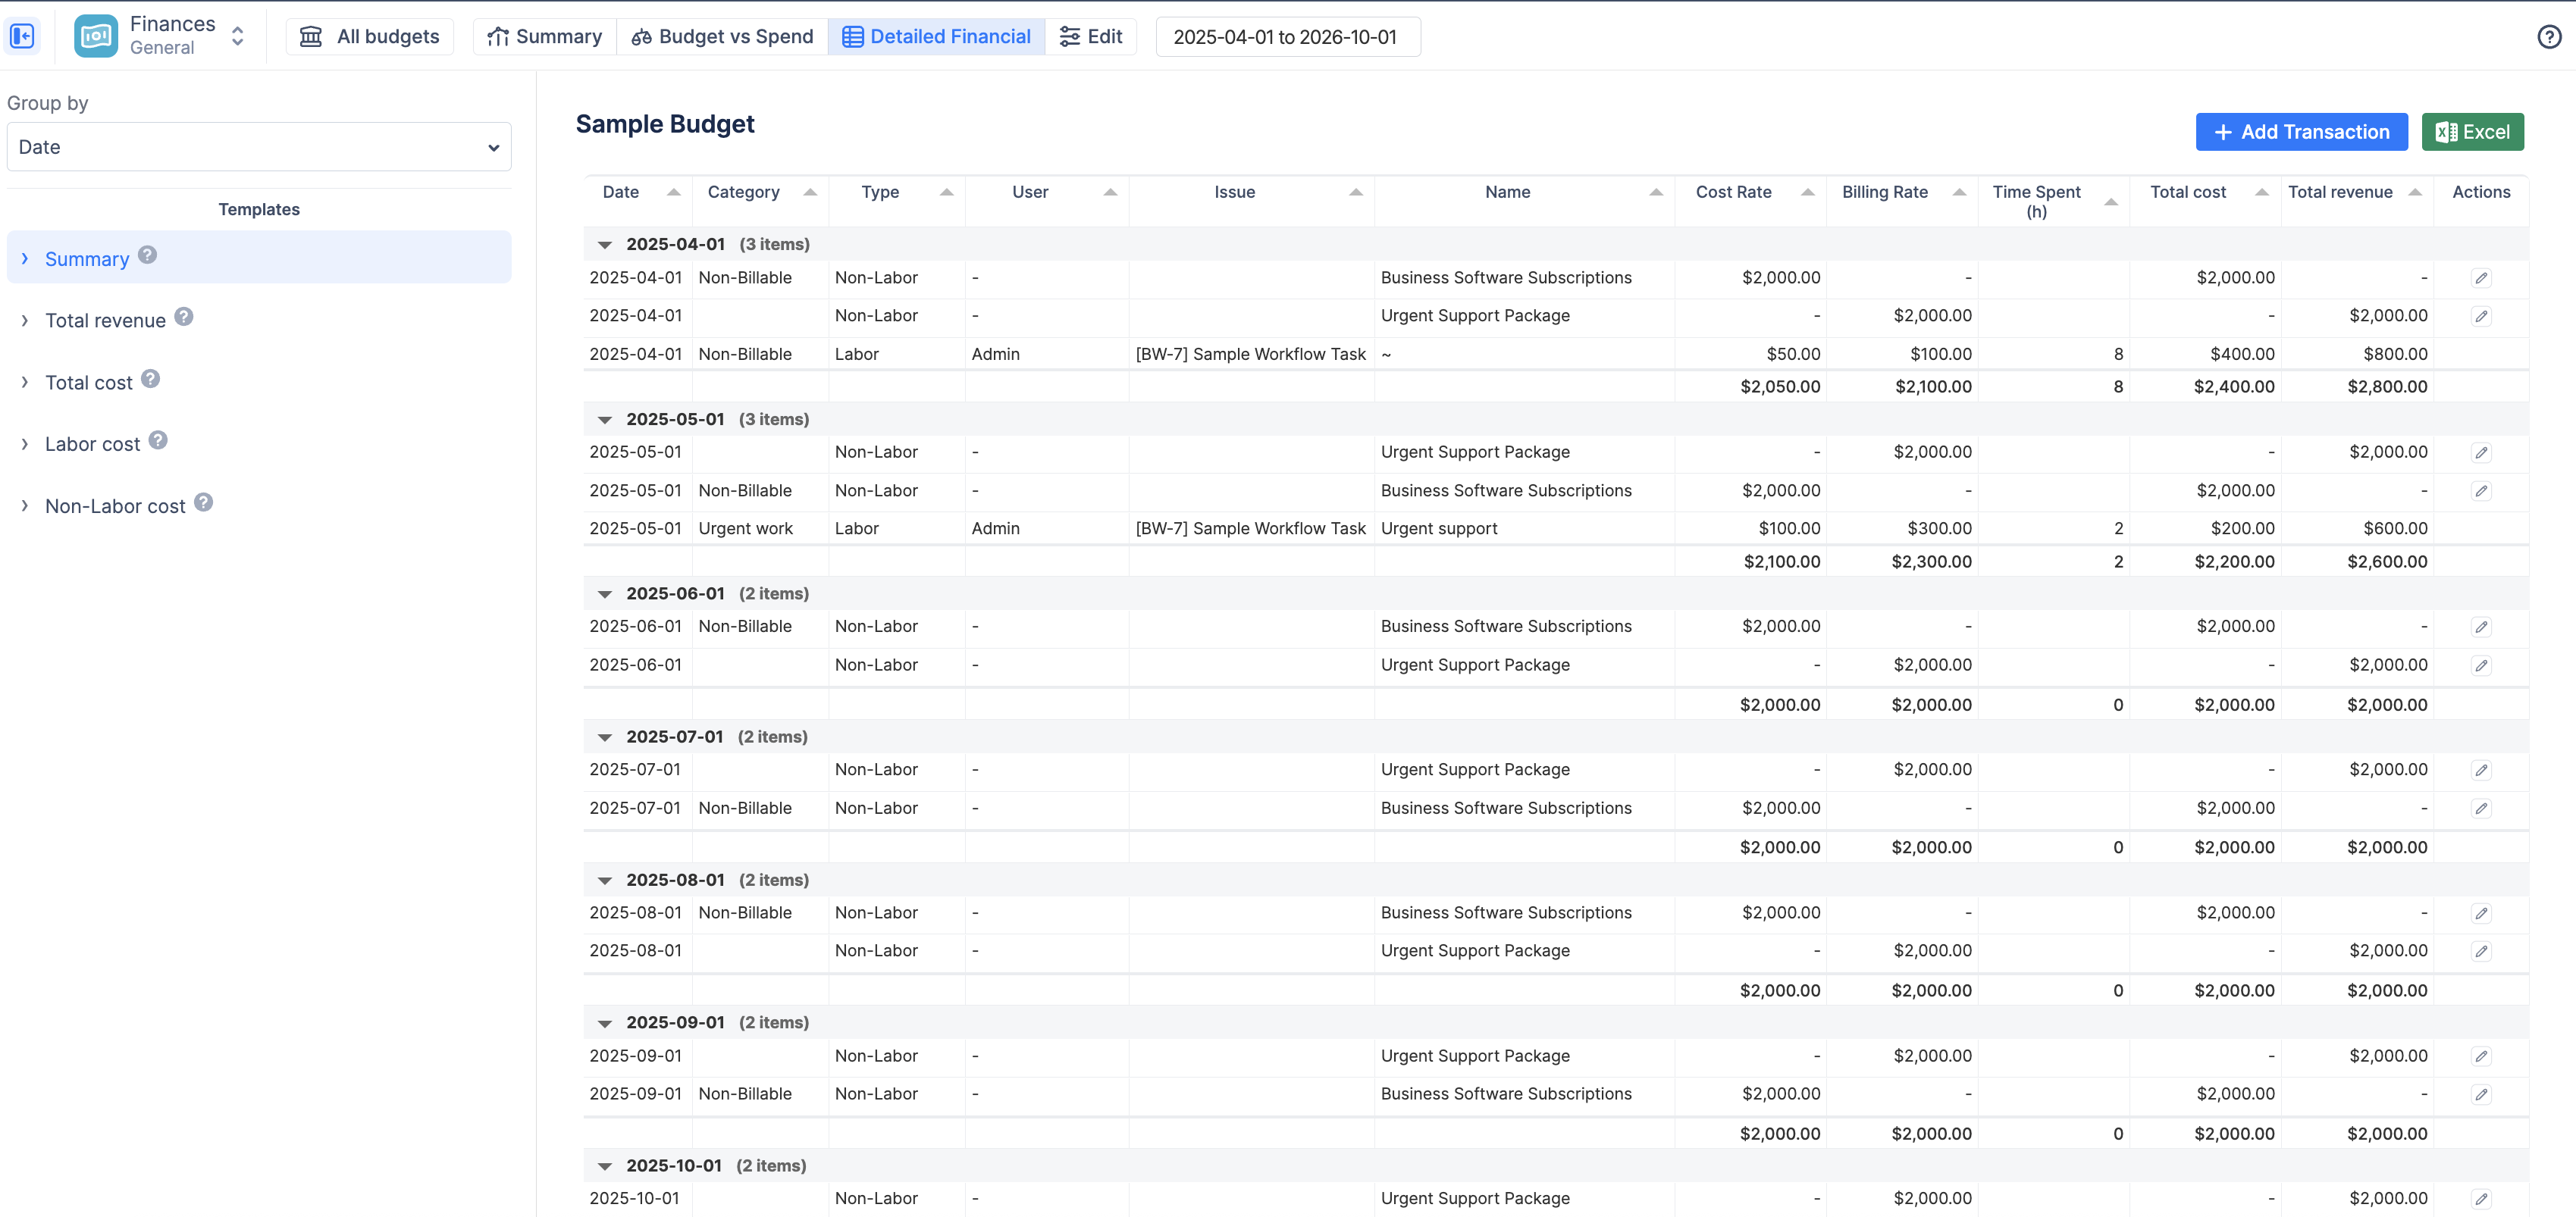
Step 4: Add Manual Transactions (Fixed Costs & Revenue)
While ActivityTimeline automatically calculates labor costs based on Jira worklogs, real-world projects always include non-labor items. You need to record these fixed expenses (like software licenses, travel, or contractor fees) to ensure your total actual spend is accurate.
-
You can add manual transactions from any report screen (Summary, Budget vs Spend, or Detailed Financial).
-
Click the blue + Add Transaction button in the top right corner.
-
In the popup, choose whether this item is an Expense (a cost to the project) or Revenue (income generated).
-
Provide a clear Name (e.g., "Urgent support package"), the monetary Amount, and the Date the transaction occurred.
-
(Optional) Select a Category (e.g., "Urgent work"). This ensures the cost is grouped correctly when you view your pie charts and summary reports.
-
(Optional) Choose to link the transaction directly to a specific Jira Issue or User for deeper reporting later.
-
Click Submit.
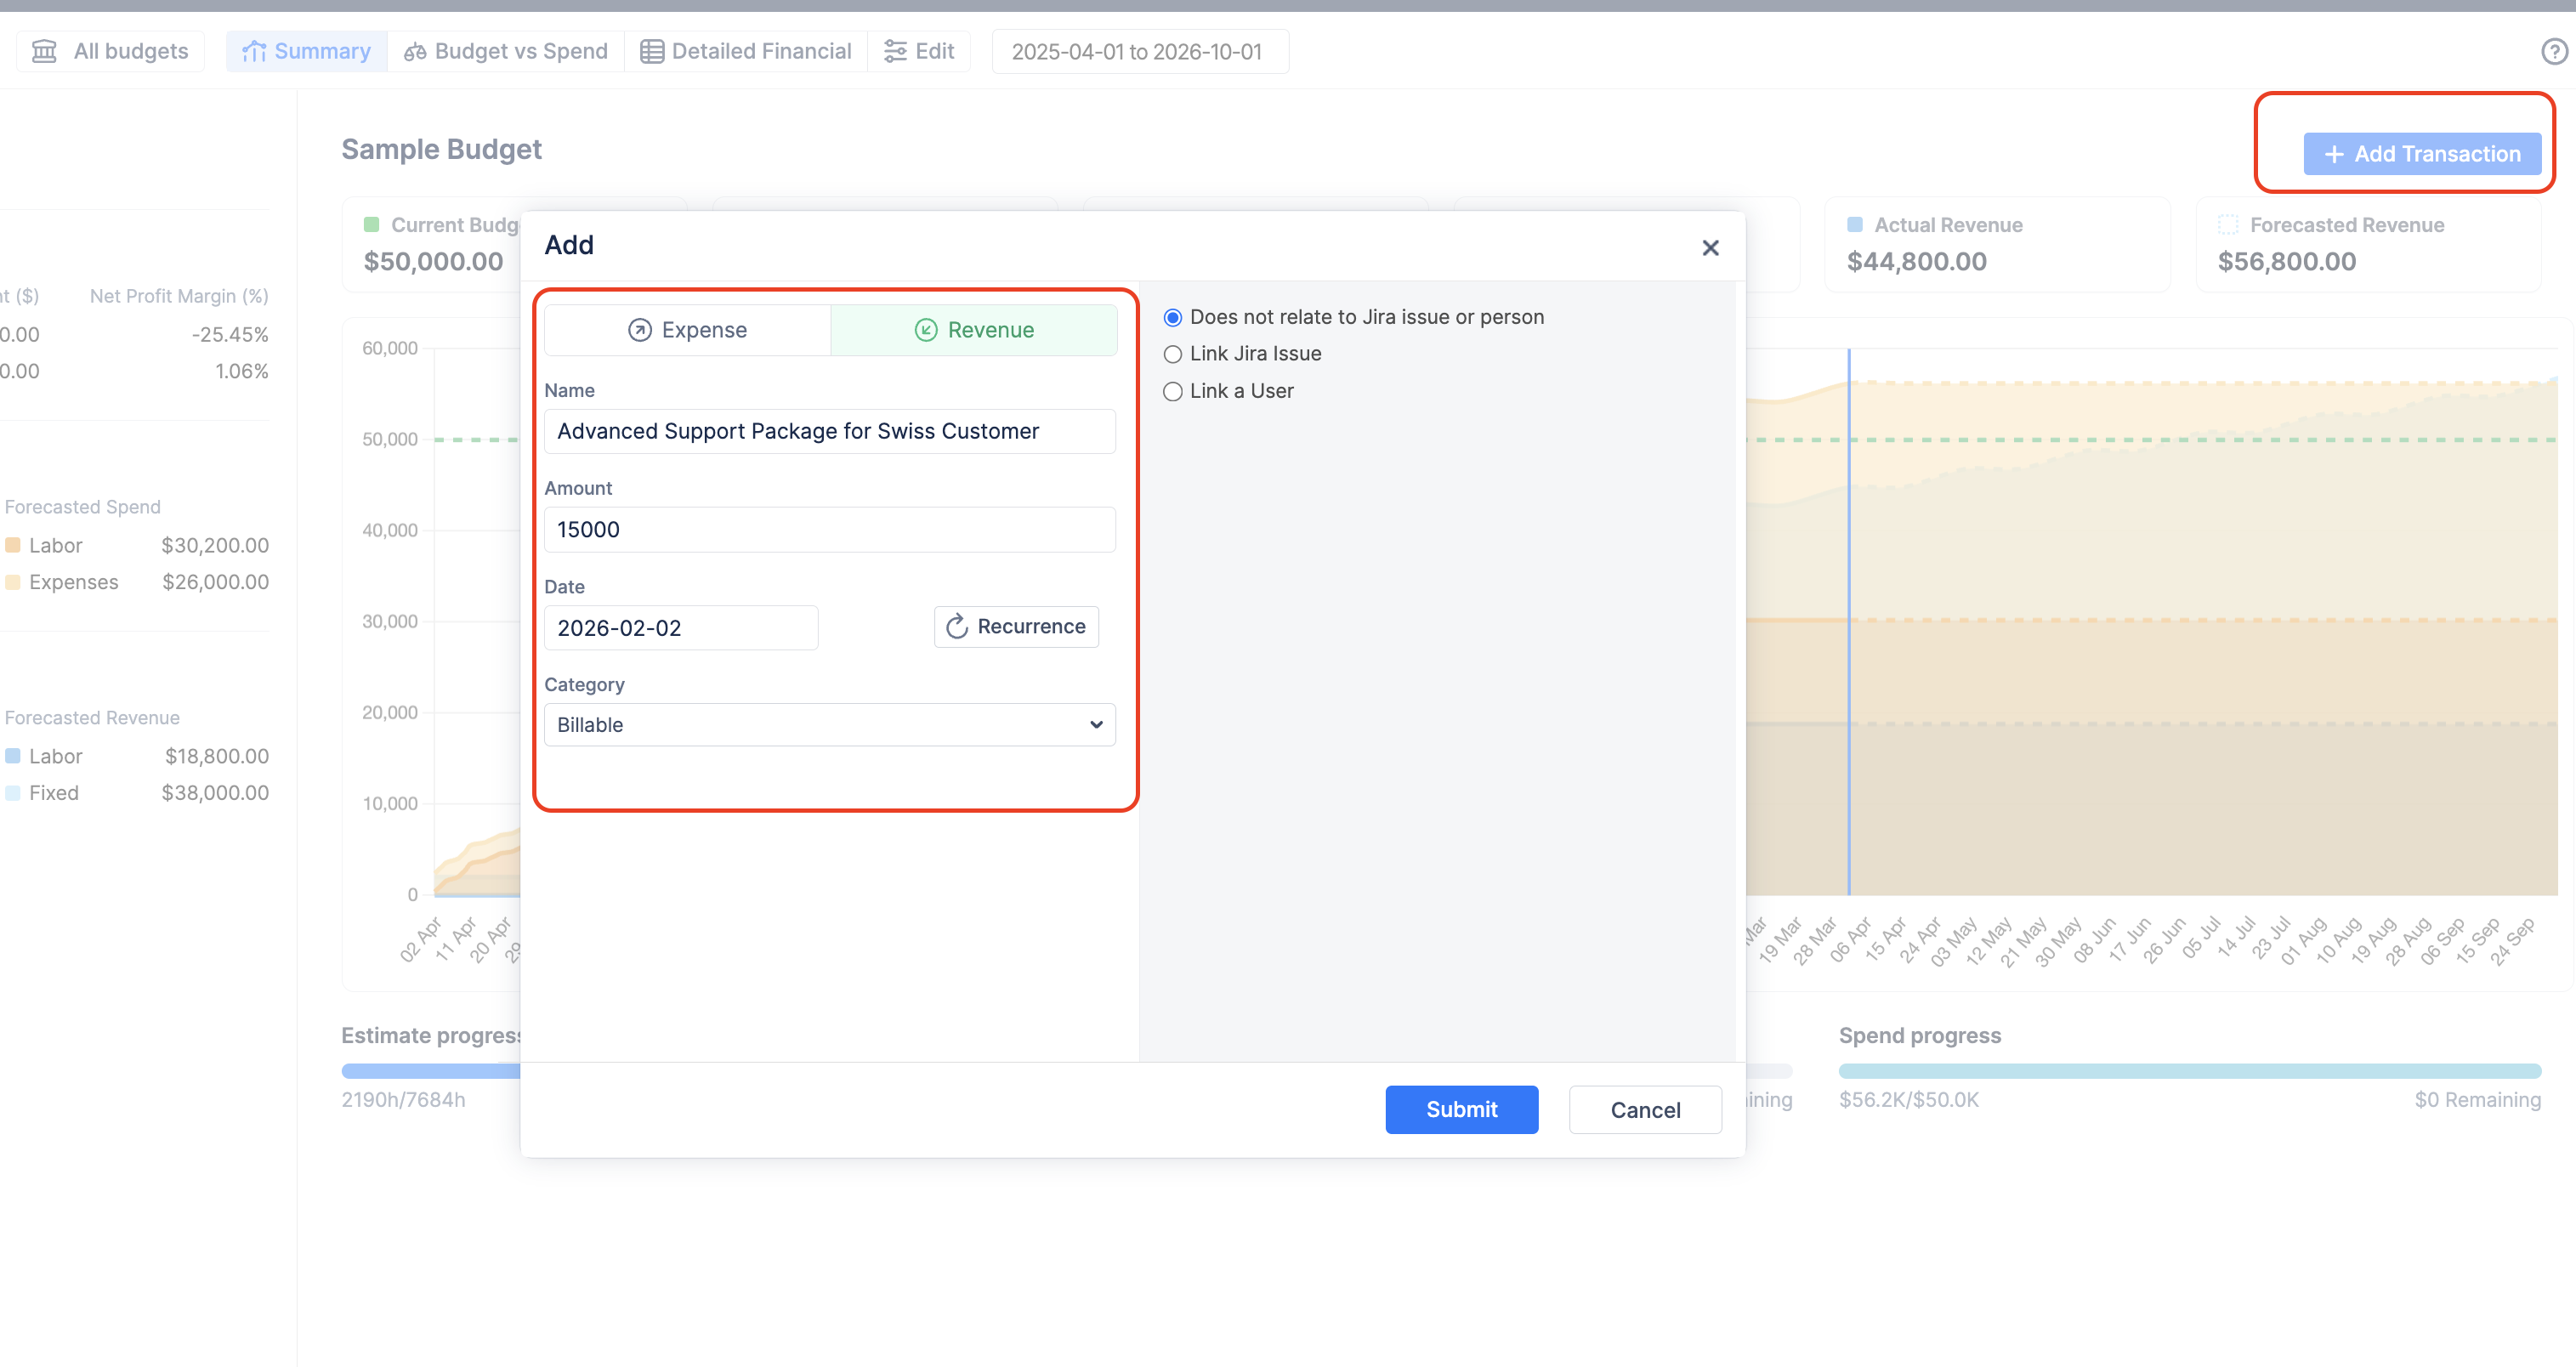
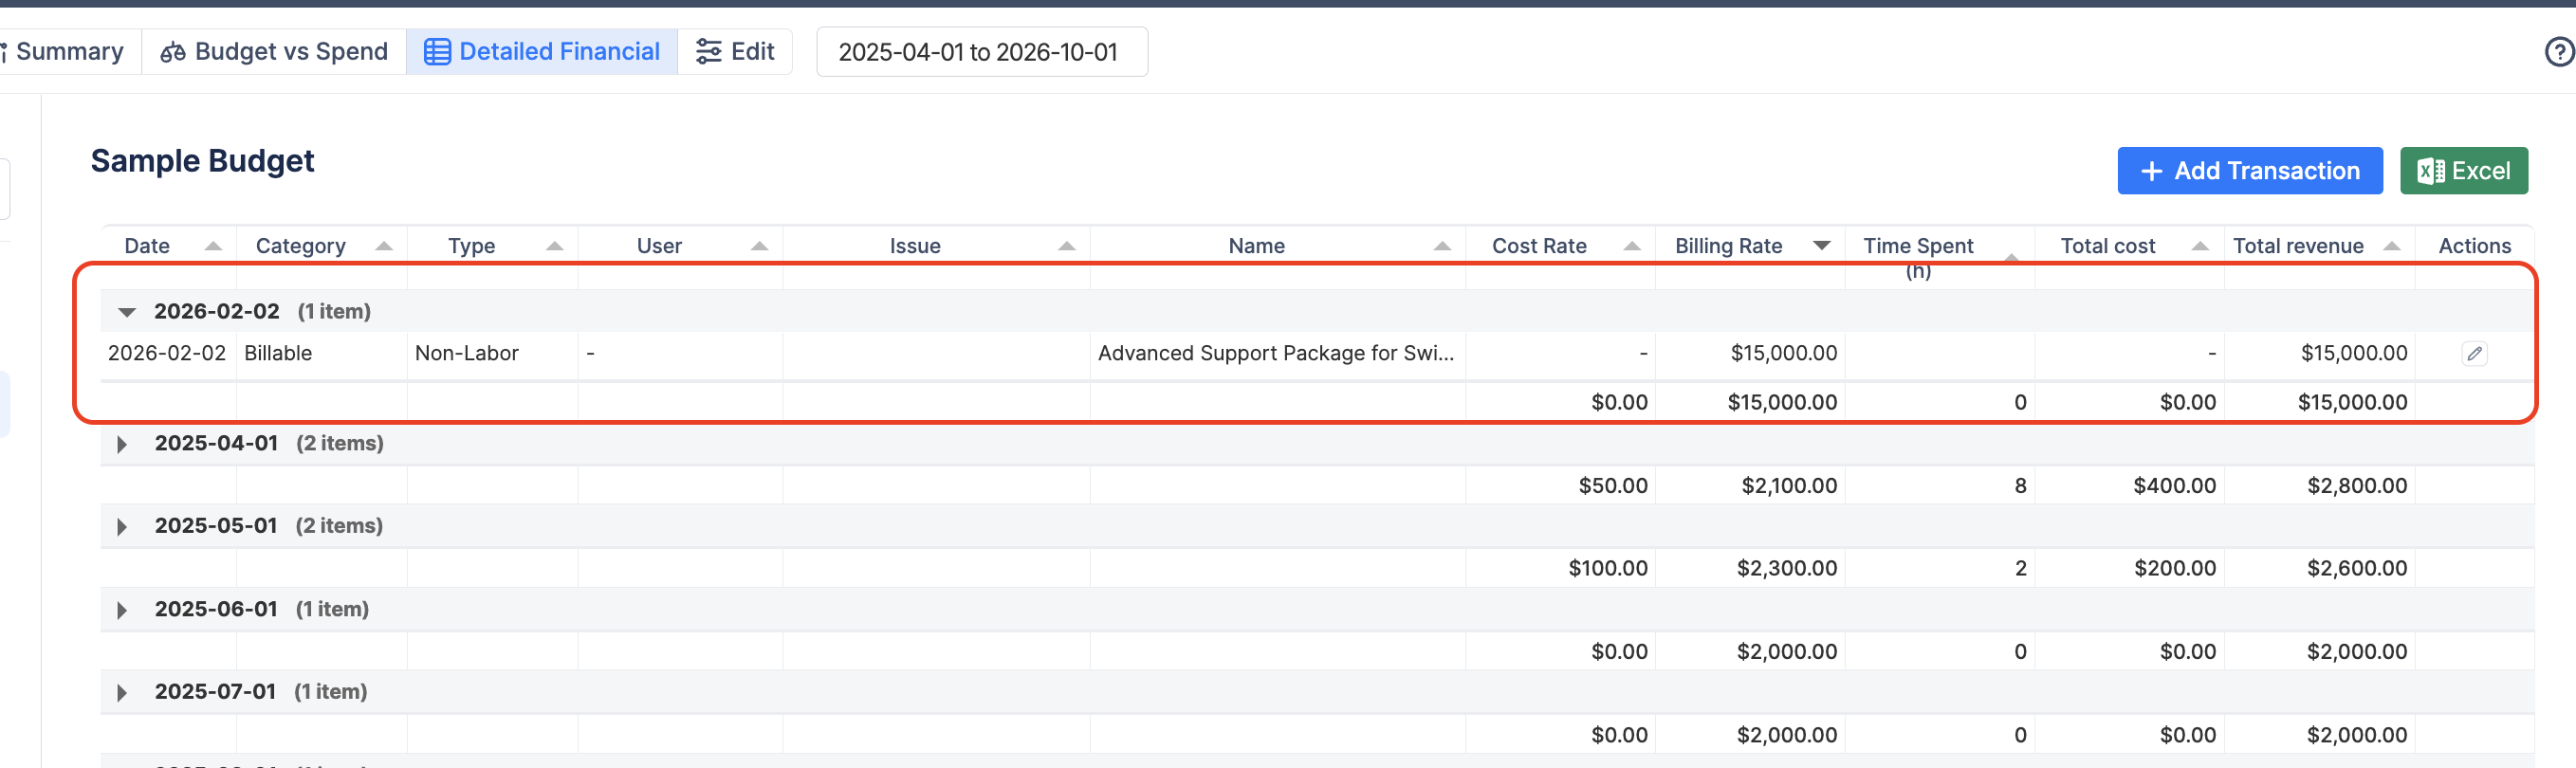
This transaction is now saved to your budget and will immediately update the "Actual Spend" (or Revenue) totals across all your reports:
Step 5: Track Your Financials
Voilà! You have successfully created your first Budget.
With your budget scope defined, labor rates assigned, targets allocated, and initial expenses logged, ActivityTimeline is now automatically calculating your real-time financial data.
You can access three powerful reports to monitor your progress. Navigate between them using the tabs at the top of your budget view:
-
Summary: Your high-level dashboard. Use this view to quickly check your top KPIs (Current Budget, Actual Spend, Profit Margin) and visualize your cumulative burn rate over time. (Learn more inSummary Dashboard: Finances.
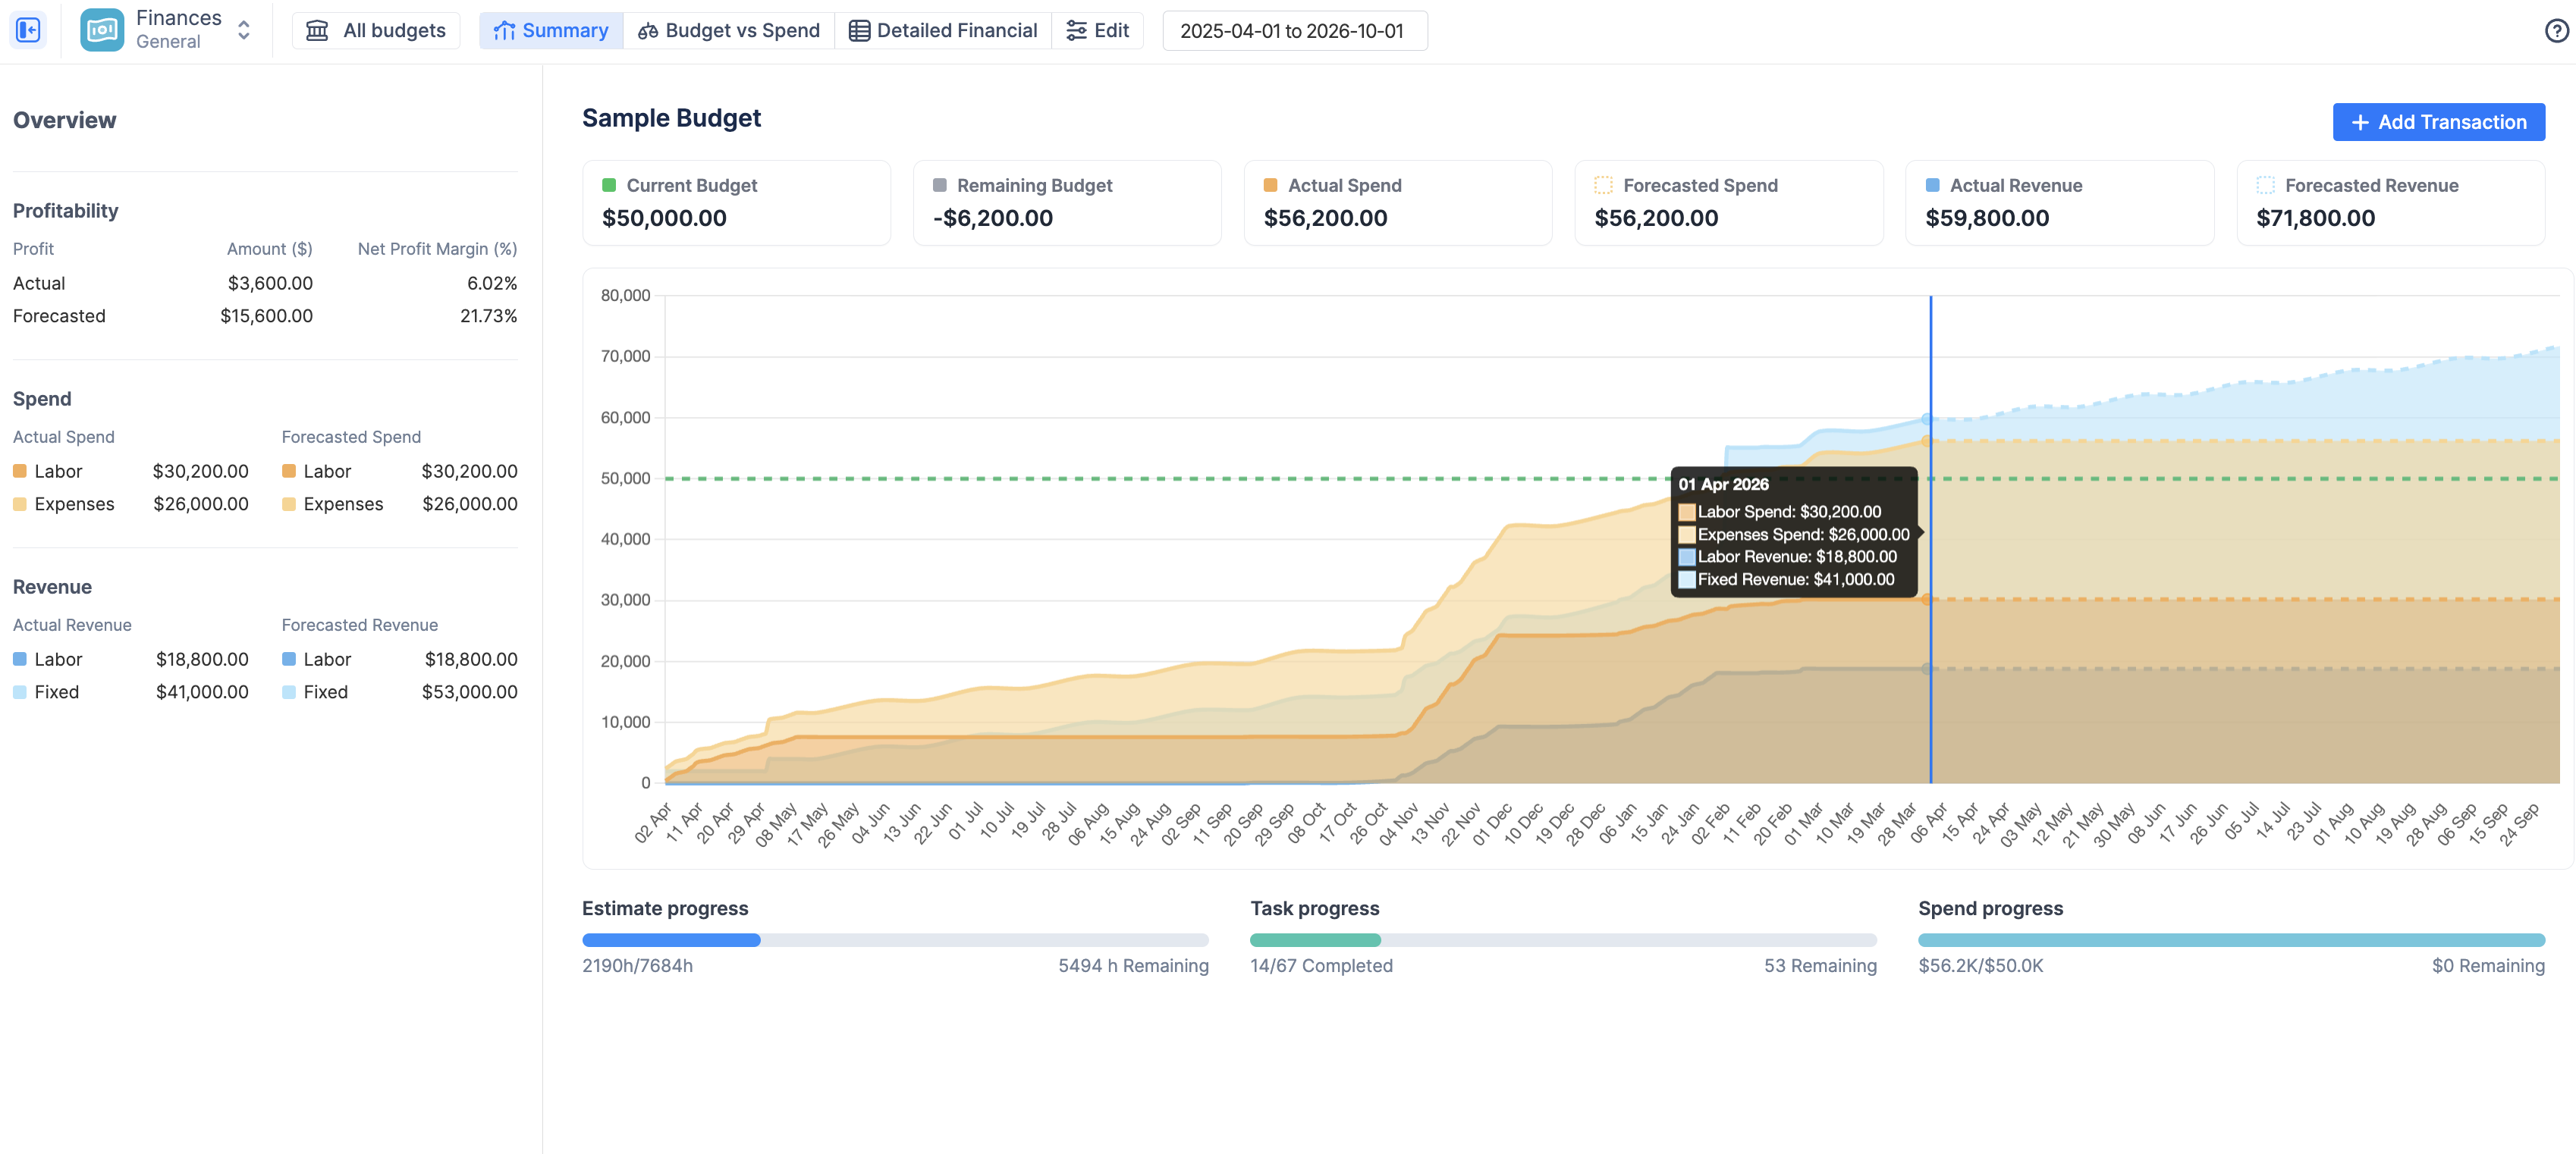
Summary Financial Report -
Budget vs Spend: Your strategic comparison tool. Use this view to compare the manual allocations you set in Step 3 against your actual, real-time spending, grouped by Category, Project, or other dimensionsBudget vs Spend Report: Finances.
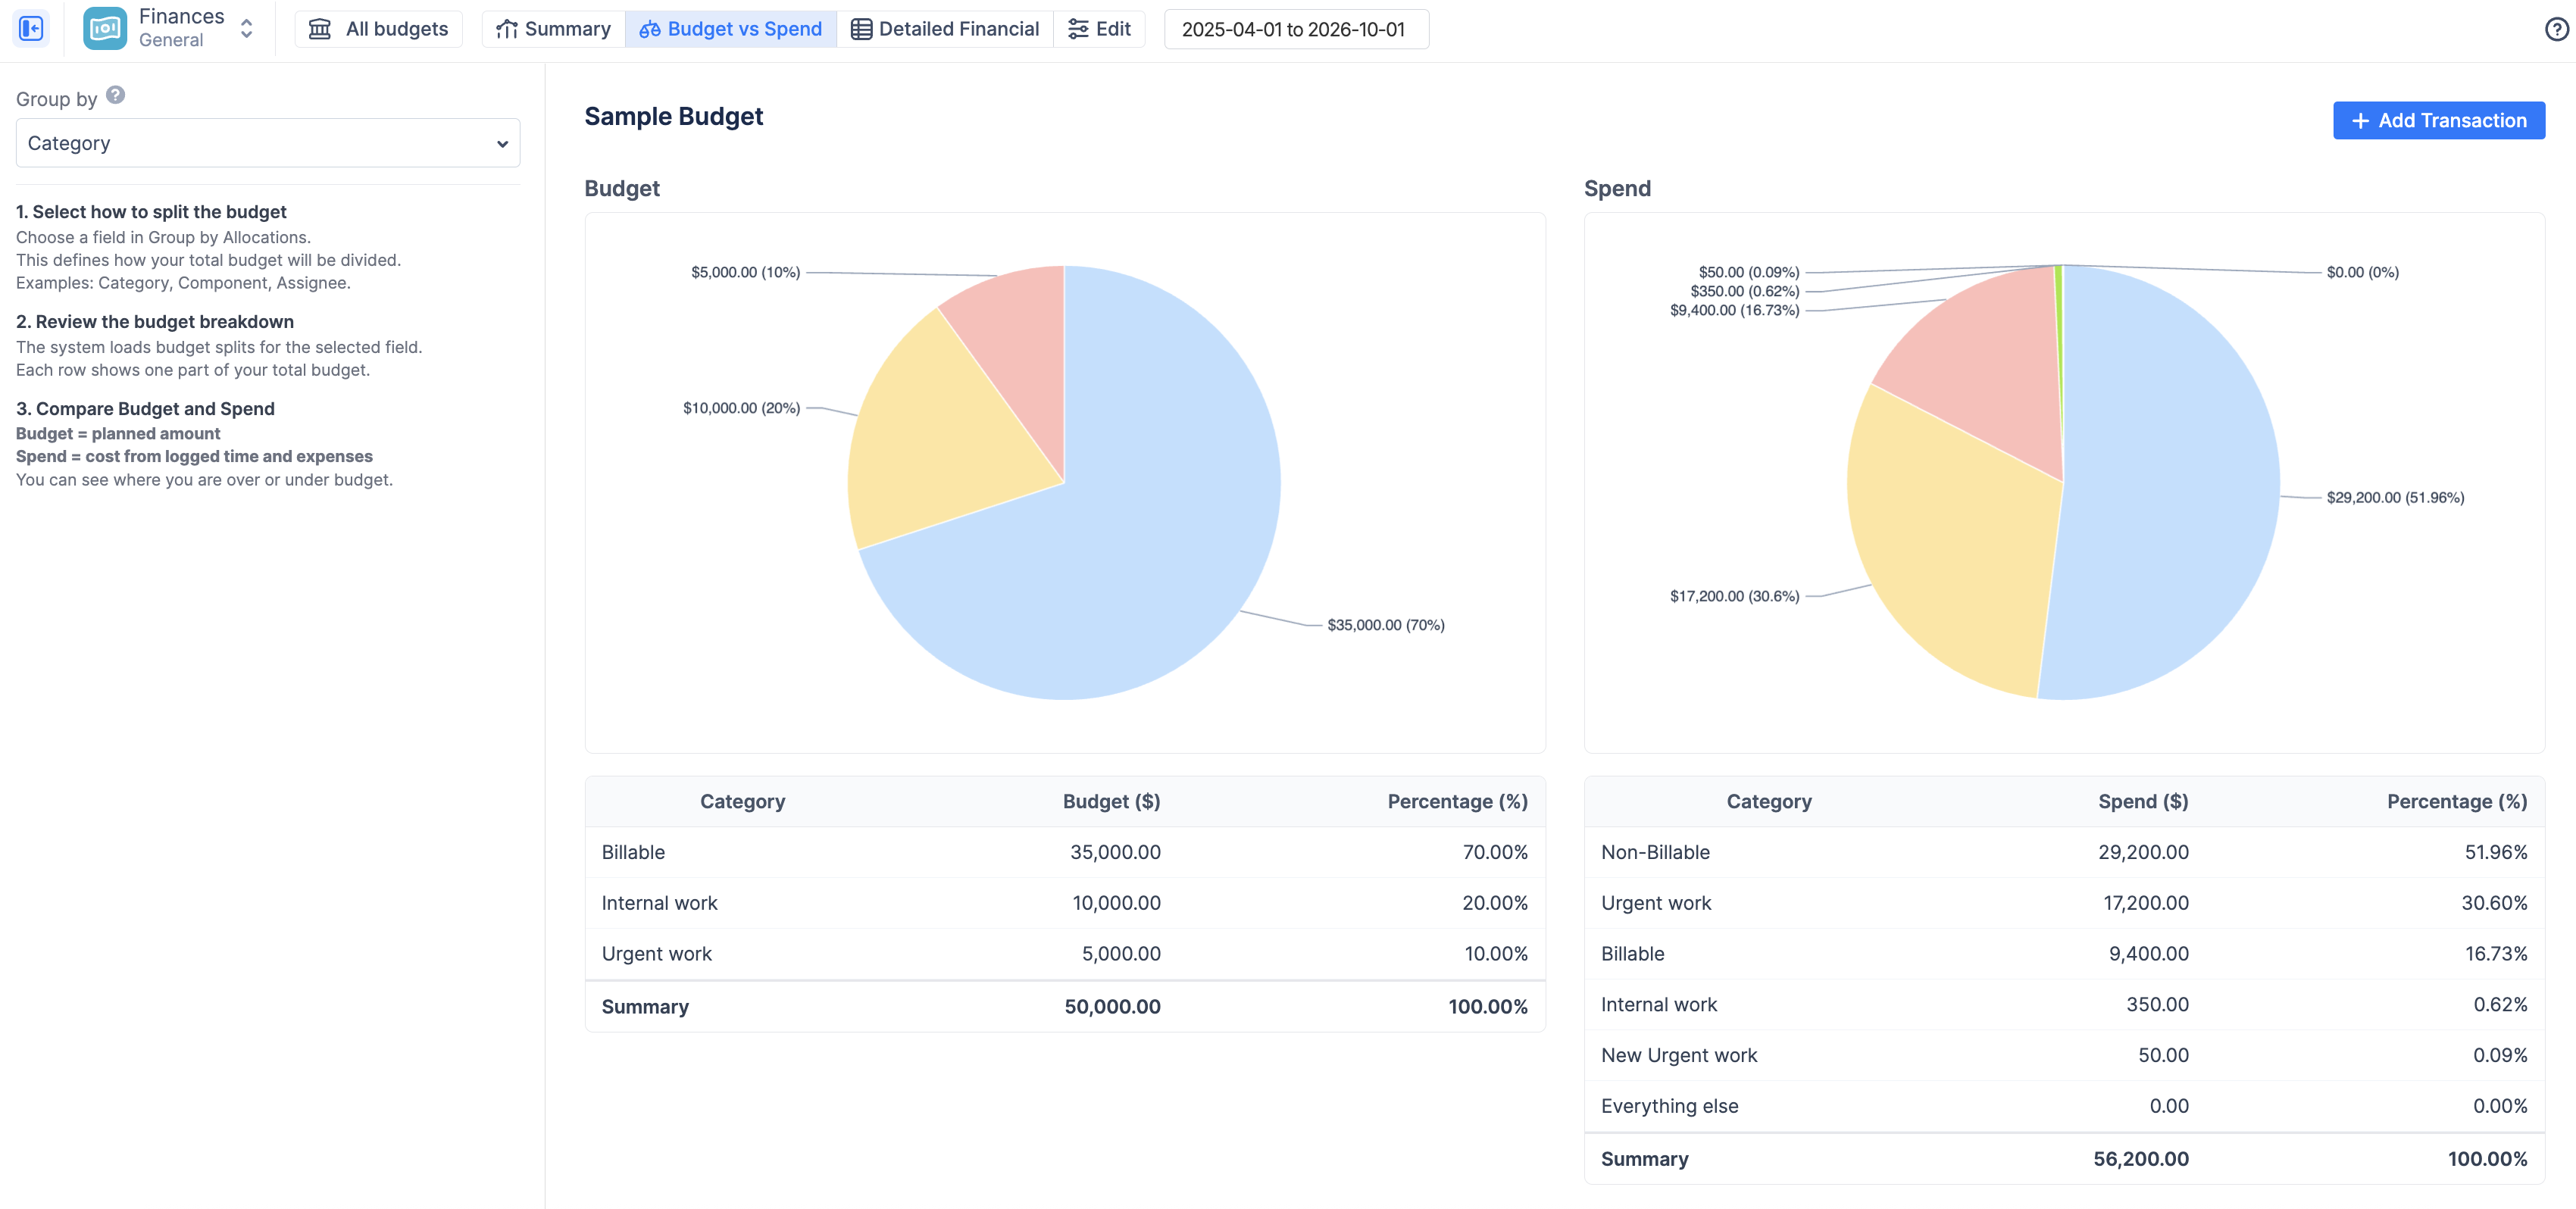
Budget vs Spend Report
-
Detailed Financial: Your auditable ledger. Use this view to see a line-by-line breakdown of every logged hour (labor cost) and every manual transaction (fixed expense/revenue) that makes up your totalsDetailed Financial Report: Finances.